DIY: 1998 Volvo V70 Ignition Switch & Cylinder Lock
By: cn90
SOURCE: http://www.matthewsvolvosite.com/forums/viewtopic.php?f=1&t=34472
Car is 1998 Volvo V70 with 106K miles.
– Symptoms: sometimes cannot crank the engine, after wiggling the key a few times, then I can start the engine. It was intermittent, then it became permanent.
– Key can turn to Position I and Position II but not Position III (crank).
– Initially I thought it was the Ignition Switch (Electrical Portion to the LEFT of Steering Column), which was replaced but same symptoms! It turned out to be the Ignition Tumbler Lock (where you insert the key).
ATT: If you replace the Ignition Tumbler Lock (where you insert the key), there is NO need to remove the Steering Wheel at all! Read on.
1. Igntition Switch (Electrical Portion is PN 9447804, $50 at Volvo dealer. Do not use aftermarket part).
2. Ignition Tumbler Assembly (where you insert the key, Volvo PN is 8626325). I bought it for $210 from (ordered Monday and got it by Fedex on Saturday, wow fast service!):
Don Snyder
Darrell Waltrip Volvo Subaru
615-599-6294 Direct
Tel. 1-800-679-6124
Fax 615-599-6253
[email protected]
3. Tools:
– Torx set
– “Trim” Hammer (this hammer is used for carpentry trim job) is useful in this tight space
– 1/32” Nail Set
– Flat Screwdriver.
FYI, 1998 and earlier models probably have no anti-theft chip in the key. I connected the Ignition Switch (Electrical Part on the LEFT of Steering Column) to the connector and use a flat screwdriver (in the location labeled “Slot”) to crank and the car starts right up.
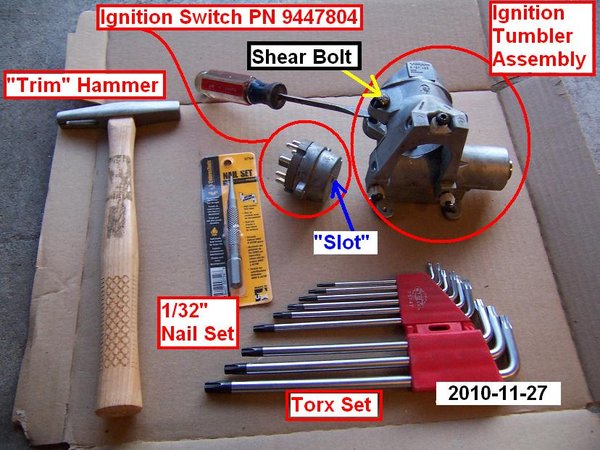
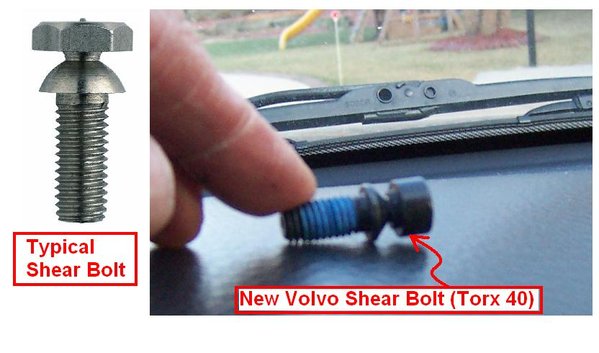
4. Shear Bolts are supplied with new Ignition Tumbler Lock Assembly. For those not familiar with Shear Bolts: these are used during assembly at factory, once the head on the Shear Bolt is tightened to a certain torque, the outer head snaps off, leaving a round inner head, making it difficult for thieves to remove. When you buy the Ignition Tumbler Lock Assembly, the Shear Bolts are supplied with it.
– During re-installation, I simply tightened the Shear Bolts snug without snapping the head off just in case I want to remove them later.
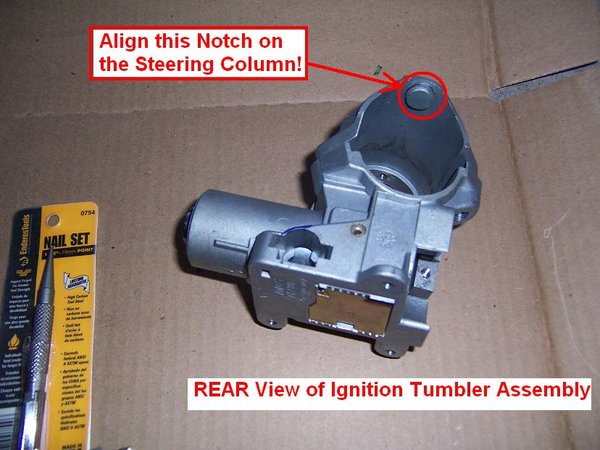
5. Have a look at the first picture above to be familiar with the setup:
– The LEFT side of the Ignition Assembly is the Electrical Portion of the Ignition: it turns I, II and III (crank).
– The RIGHT side of the Ignition Assembly (where you insert the key) can only be turned with the proper key and has a cable to control so you cannot remove the key if the car is not in Park. The RIGHT side turns the LEFT side via a flat piece of steel, pretty much similar to your lock at home.
Procedures:
1. Disconnect Battery Ground Cable for safety reasons.
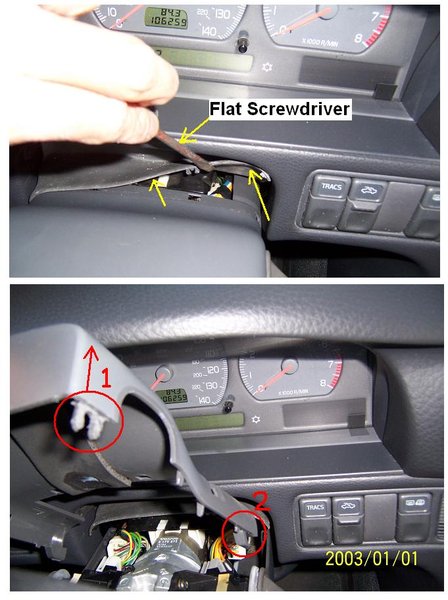
2. Use a flat screwdriver to lift off the rubber trim, then lift the Upper Cover close to SW upward (#1), then slide it toward you so it slides out of the hook (#2).
The Lower Cover is secured by three (3) Torx #25 bolts. When removing the Lower Cover, pay attention to the part around the Lighted Ring: tug the Lower Cover outward a bit so it clears the Lighted Ring then remove it.
3. Remove Turn Signal Stalk and Wiper Stalk: Each Stalk is held by two (2) Torx #25 bolts.
4. Now you can see the Shear Bolt round head. At factory, the force used to tighten the Shear Bolt was not much, so with the Nail Set you can “chisel” it out. Angle the Nail Set in such a way that it angles about 45 degrees and tap it with the “trim” Hammer Counter-Clockwise to remove the Shear Bolt.
This is why you do NOT need to remove the Steering Wheel when replacing the Ignition Tumbler Lock Assembly.
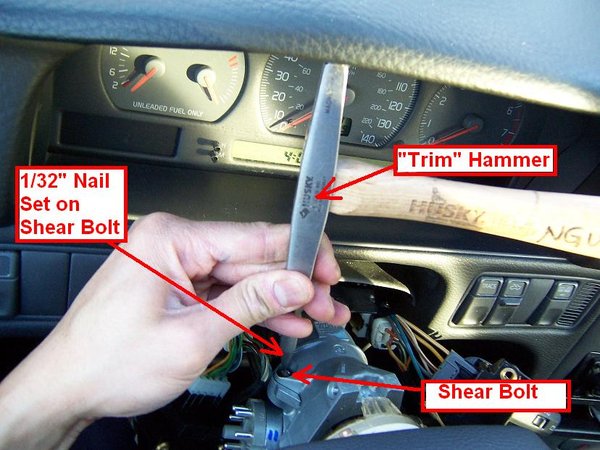
5. Use a flat screwdriver to gently disconnect the Connector to the Ignition Switch (left side of Steering Column).
Disconnect the three Torx Bolts holding the Horn/Air Bag Ring (aka “Clockspring”).
Once the Shear Bolts are removed, the Cylinder Lock Assembly will fall down, so support it with your knees.
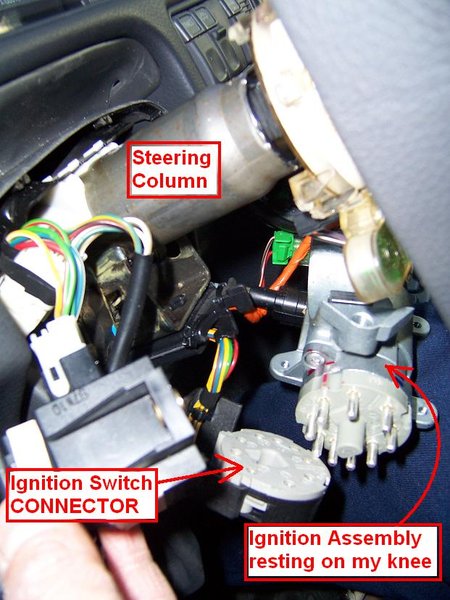
6. Now disconnect the Lighted Ring connector then remove the Lighted Ring from the Assembly.
7. To remove the Parking Release Cable: squeeze both sides of the tabs and use a flat screwdriver to gently pry it out. But first use a Sharpie to mark the depth of insertion of this Parking Release Cable so you know how much to insert it to the new Assembly. I think the key needs to be in position II to insert this Parking Release Cable.
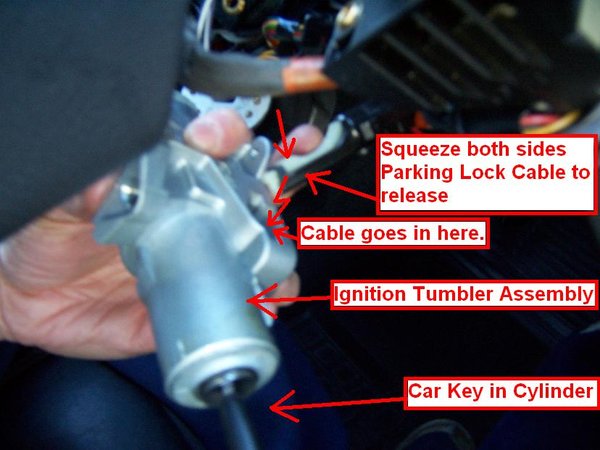
8. If you decide to keep your Ignition Switch (Electrical Portion), then remove it using Torx #20 key, then transfer it to the new Ignition Tumbler Assembly. Note there are a large and a small notch so it can only be aligned 1 way.
However, at 100K, I think it is better to replace both the Ignition Switch (Electrical Portion) and the Ignition Tumbler Assembly.
9. Re-assembly is straightforward, make sure the notch on the Ignition Tumbler Assembly lines up with the Steering Column hole before you tighten the Shear Bolts. Again, I did not snap the heads of the Shear Bolts, just finger-tight and snug.
Also make sure the Rubbers around the Turn Signal and Wiper Stalks fit properly on the Upper and Lower Covers.
