Posted by OurVolvo.com on Aug 20, 2012 in
1999 Volvo V70 How To Change The Ignition Switch on a Volvo 850
By NYC-Volvo
SOURCE: http://www.matthewsvolvosite.com/forums/viewtopic.php?f=1&t=37398
I just changed the ignition switch in my 1996 850 R, and I’d like to share the process with you. I’ve taken photos to make it easier for you to follow along. I rate this job as easy. I am not a mechanic, but I am handy. This repair took me 18 minutes from start to finish. So that 18 minutes includes the time it took me to gather my tools, go outside to the car, do the repair, take photos, clean everything up, and put my tools away. 18 minutes… it was much quicker that I expected.
Tools you will need
· Slotted screwdriver
· #25 Torx driver (the shank must be at least 3.75”)
Prepare your work area
· Move the seat back
· Adjust the steering column all the way out and down
· Make sure the engine is not running and the key is in the off position
Instructions
The following photo shows the underside of the steering column…
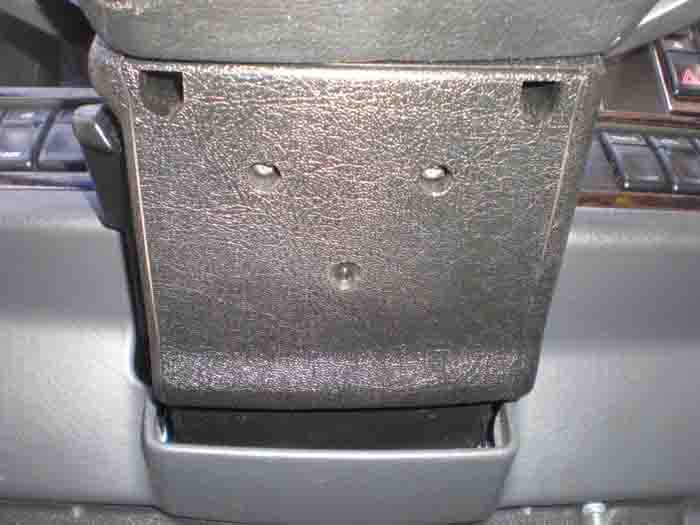
There are four #25 torx screws that hold both the lower and the upper cover to the steering column. You cannot see the upper cover in this photo, all four screws are accessed via the lower cover. The red circles show where the screws are for the removal of the upper cover. The yellow circles show the screws that hold the lower cover. Please take note that the screws for the upper cover are recessed, and you will need a #25 torx driver with a minimum of 3.75 inches of shank to reach in.

First remove the two screws holding the upper cover, and lift the upper cover up to remove it…
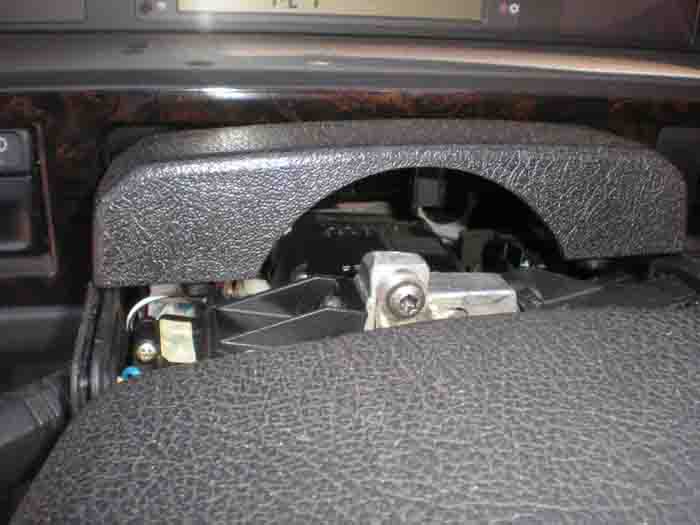
Remove the two screws holding the lower cover. To remove the lower cover, you will need to lift it over the ignition key area as you pull the cover down. Once you have the lower cover off, you will have the necessary access needed for this job…
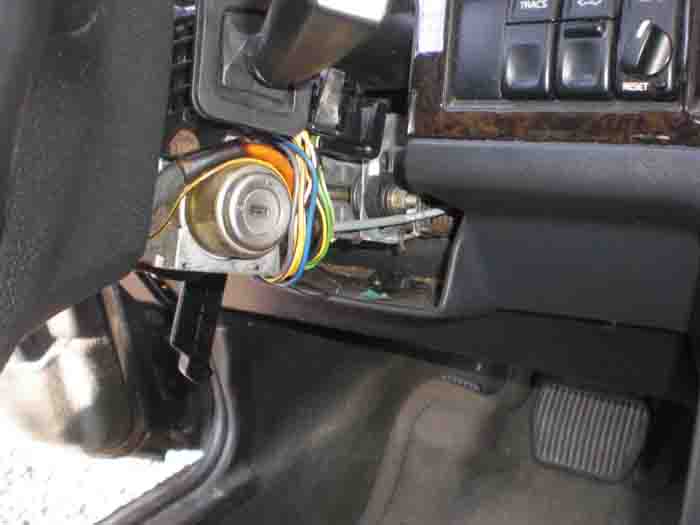
You are now ready to change the ignition switch…
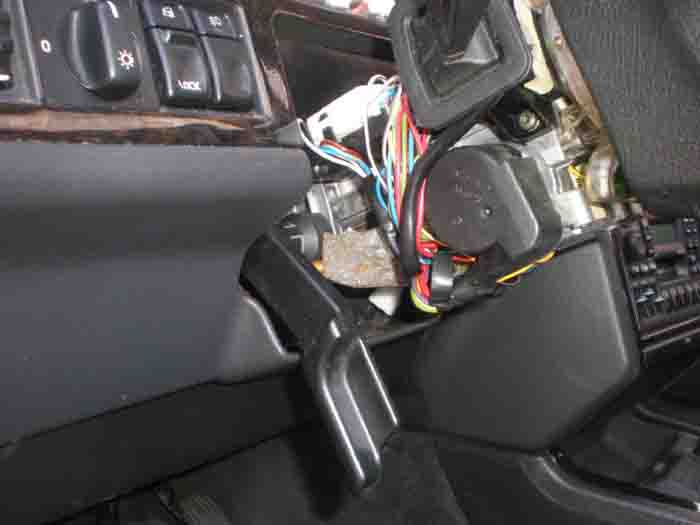
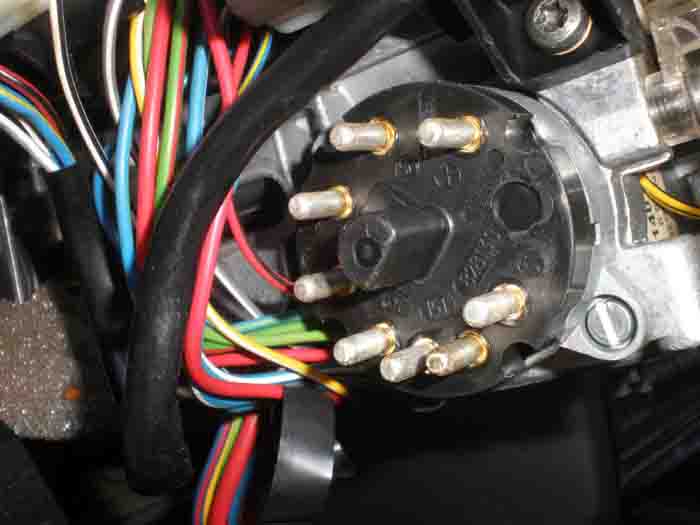
Next, remove the wiring conncetor from the ignition switch. I have circled the wiring connector in red…
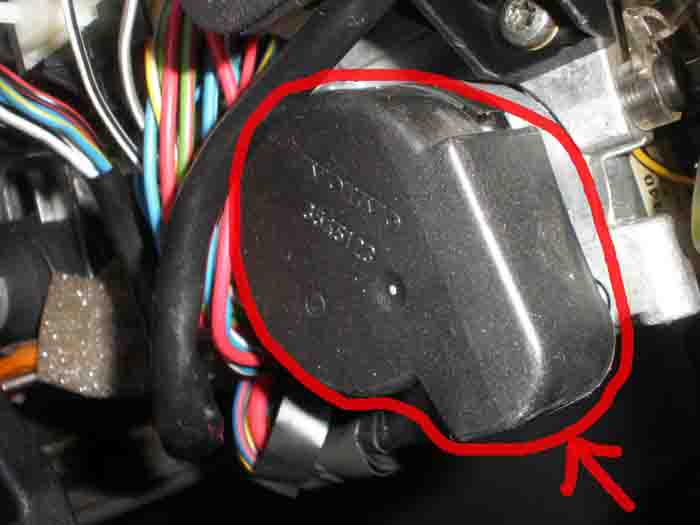
Hold the connector firmly and pull it out with a light rocking motion. Be careful not to damage the connector…
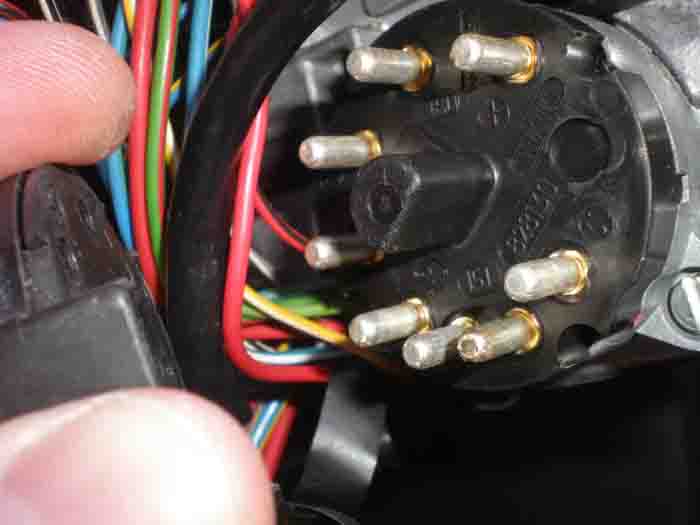
Next, using a slotted screwdriver, remove each of the two screws holding the switch in place…
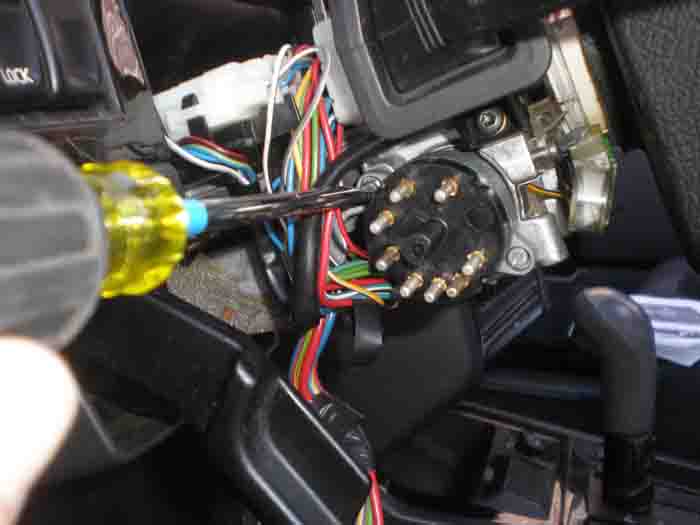
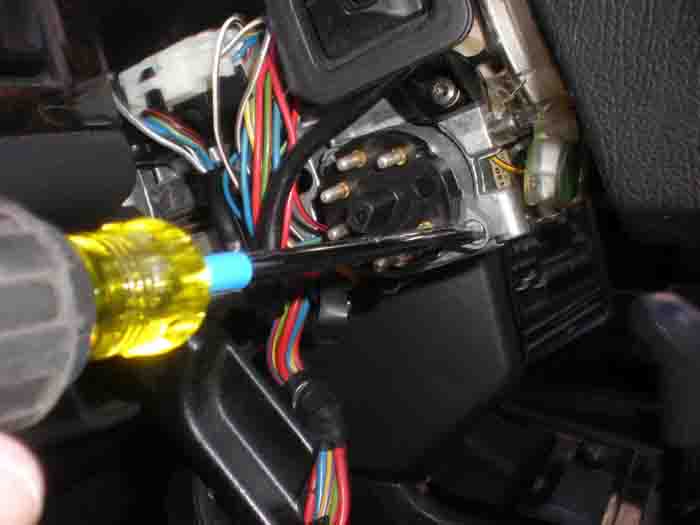
You are now ready to install the new switch. You need to ensure that the switch lines up with the position of the key. To do this, put the ignition key in the keyhole, put the new ignition switch in place and hold it witih one hand (do not screw it in yet), turn the key with the other hand until the key and the switch line up. You will know when it is lined up becuase the new switch will be seated firmly in place. Once everything is lined up, continue to hold the new switch in place, and remove the key from the ignition…
Secure the ignition switch with the two screws…
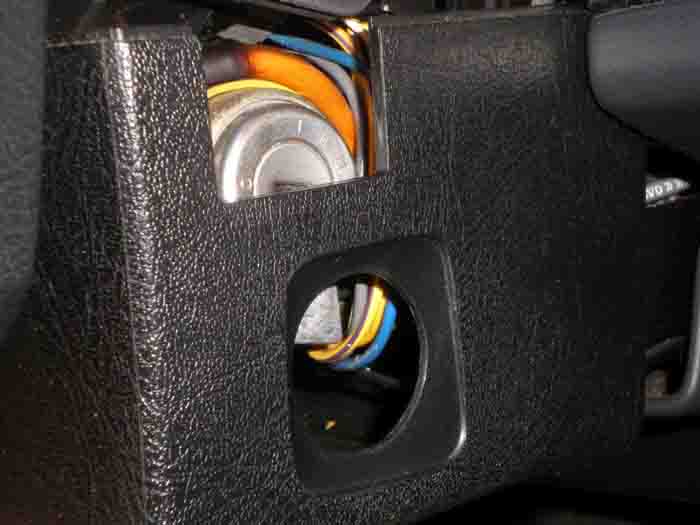
Reinstall the lower steering column cover. Be careful to get it into place over the ignition, and be sure to line up the rubber from the directional stalk and the wiper stalk. Fasten with two torx screws…
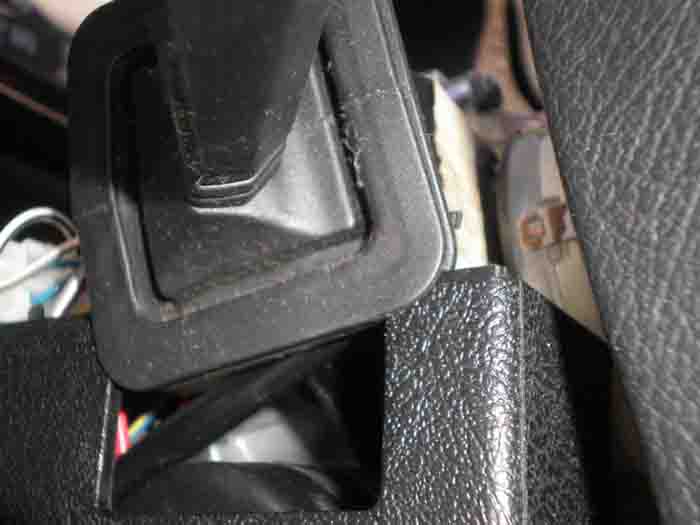
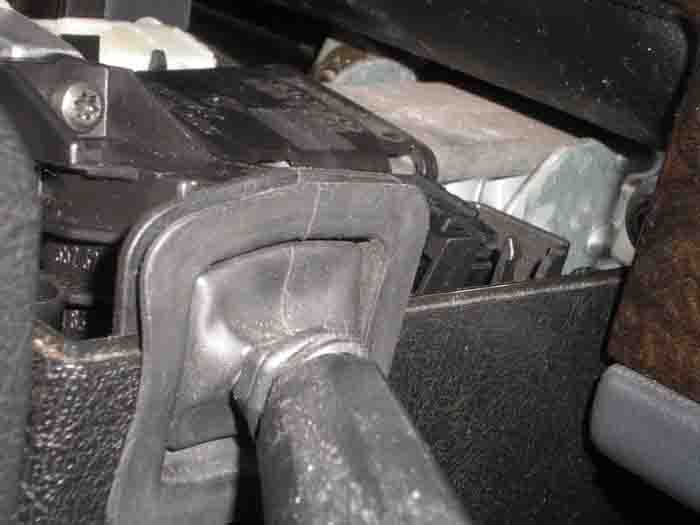
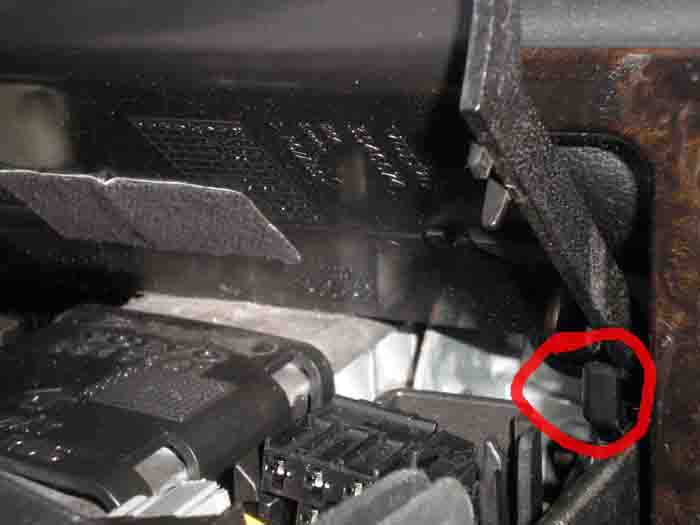
Reinstall the upper steering colum cover. Be sure to slide the rear of the cover in first and make sure it “hinges” (see below) so it will seat properly. Install the two screws to secure it in place…
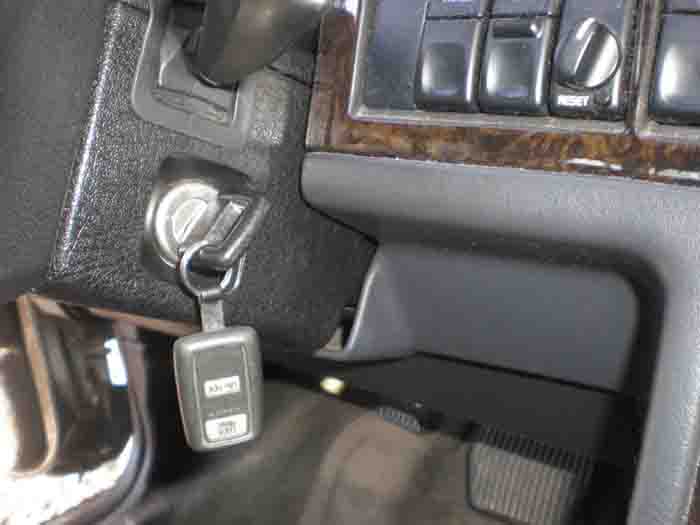
Tags: 850, ignition, replacement, switch, Volvo
Posted by OurVolvo.com on Aug 5, 2012 in
1999 Volvo V70 By: cn90
SOURCE: http://www.matthewsvolvosite.com/forums/viewtopic.php?f=1&t=34472
Car is 1998 Volvo V70 with 106K miles.
– Symptoms: sometimes cannot crank the engine, after wiggling the key a few times, then I can start the engine. It was intermittent, then it became permanent.
– Key can turn to Position I and Position II but not Position III (crank).
– Initially I thought it was the Ignition Switch (Electrical Portion to the LEFT of Steering Column), which was replaced but same symptoms! It turned out to be the Ignition Tumbler Lock (where you insert the key).
ATT: If you replace the Ignition Tumbler Lock (where you insert the key), there is NO need to remove the Steering Wheel at all! Read on.
1. Igntition Switch (Electrical Portion is PN 9447804, $50 at Volvo dealer. Do not use aftermarket part).
2. Ignition Tumbler Assembly (where you insert the key, Volvo PN is 8626325). I bought it for $210 from (ordered Monday and got it by Fedex on Saturday, wow fast service!):
Don Snyder
Darrell Waltrip Volvo Subaru
615-599-6294 Direct
Tel. 1-800-679-6124
Fax 615-599-6253
[email protected]
3. Tools:
– Torx set
– “Trim” Hammer (this hammer is used for carpentry trim job) is useful in this tight space
– 1/32” Nail Set
– Flat Screwdriver.
FYI, 1998 and earlier models probably have no anti-theft chip in the key. I connected the Ignition Switch (Electrical Part on the LEFT of Steering Column) to the connector and use a flat screwdriver (in the location labeled “Slot”) to crank and the car starts right up.
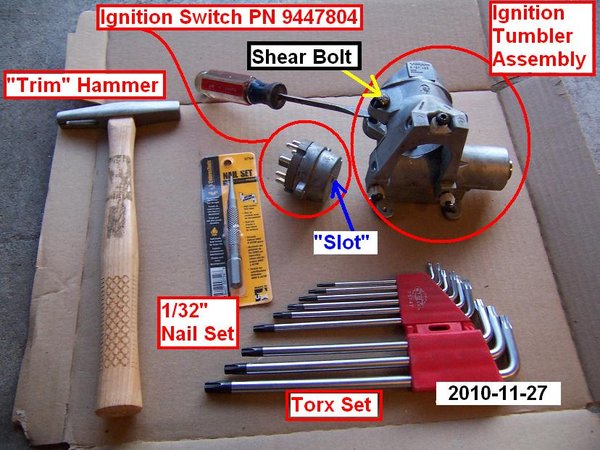
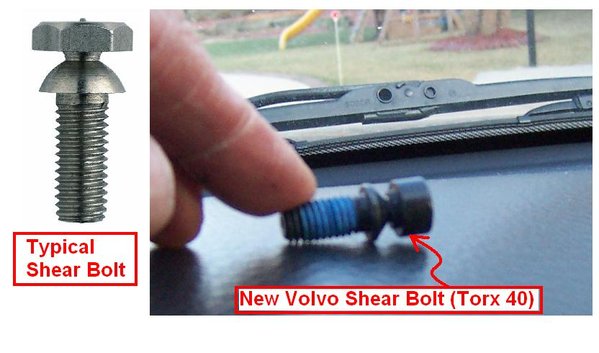
4. Shear Bolts are supplied with new Ignition Tumbler Lock Assembly. For those not familiar with Shear Bolts: these are used during assembly at factory, once the head on the Shear Bolt is tightened to a certain torque, the outer head snaps off, leaving a round inner head, making it difficult for thieves to remove. When you buy the Ignition Tumbler Lock Assembly, the Shear Bolts are supplied with it.
– During re-installation, I simply tightened the Shear Bolts snug without snapping the head off just in case I want to remove them later.
5. Have a look at the first picture above to be familiar with the setup:
– The LEFT side of the Ignition Assembly is the Electrical Portion of the Ignition: it turns I, II and III (crank).
– The RIGHT side of the Ignition Assembly (where you insert the key) can only be turned with the proper key and has a cable to control so you cannot remove the key if the car is not in Park. The RIGHT side turns the LEFT side via a flat piece of steel, pretty much similar to your lock at home.
Procedures:
1. Disconnect Battery Ground Cable for safety reasons.
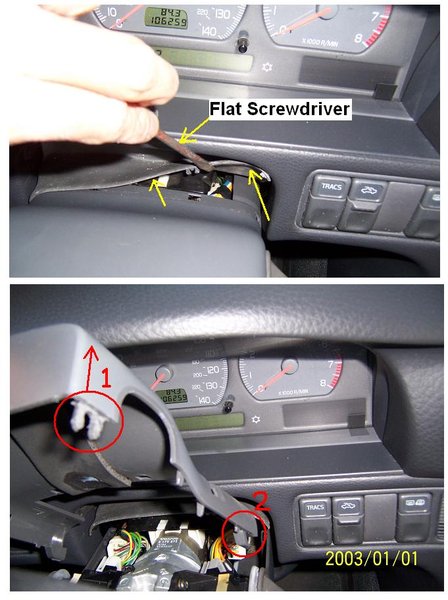
2. Use a flat screwdriver to lift off the rubber trim, then lift the Upper Cover close to SW upward (#1), then slide it toward you so it slides out of the hook (#2).
The Lower Cover is secured by three (3) Torx #25 bolts. When removing the Lower Cover, pay attention to the part around the Lighted Ring: tug the Lower Cover outward a bit so it clears the Lighted Ring then remove it.
3. Remove Turn Signal Stalk and Wiper Stalk: Each Stalk is held by two (2) Torx #25 bolts.
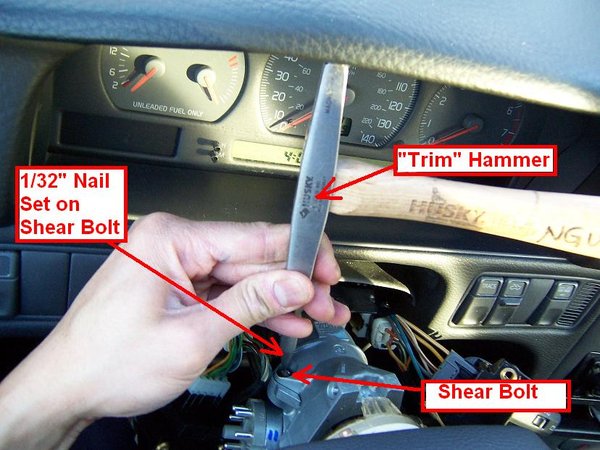
4. Now you can see the Shear Bolt round head. At factory, the force used to tighten the Shear Bolt was not much, so with the Nail Set you can “chisel” it out. Angle the Nail Set in such a way that it angles about 45 degrees and tap it with the “trim” Hammer Counter-Clockwise to remove the Shear Bolt.
This is why you do NOT need to remove the Steering Wheel when replacing the Ignition Tumbler Lock Assembly.
5. Use a flat screwdriver to gently disconnect the Connector to the Ignition Switch (left side of Steering Column).
Disconnect the three Torx Bolts holding the Horn/Air Bag Ring (aka “Clockspring”).
Once the Shear Bolts are removed, the Cylinder Lock Assembly will fall down, so support it with your knees.
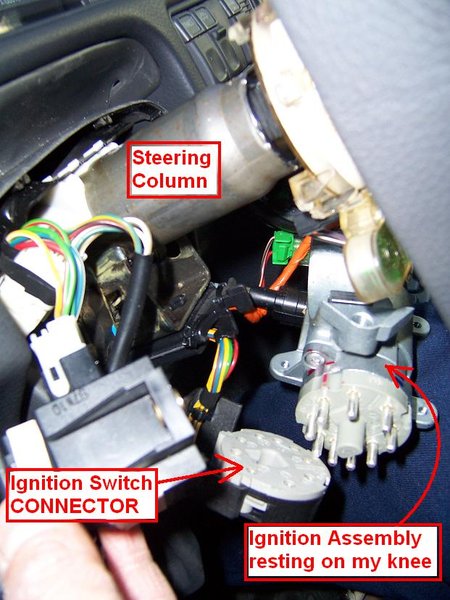
6. Now disconnect the Lighted Ring connector then remove the Lighted Ring from the Assembly.
7. To remove the Parking Release Cable: squeeze both sides of the tabs and use a flat screwdriver to gently pry it out. But first use a Sharpie to mark the depth of insertion of this Parking Release Cable so you know how much to insert it to the new Assembly. I think the key needs to be in position II to insert this Parking Release Cable.
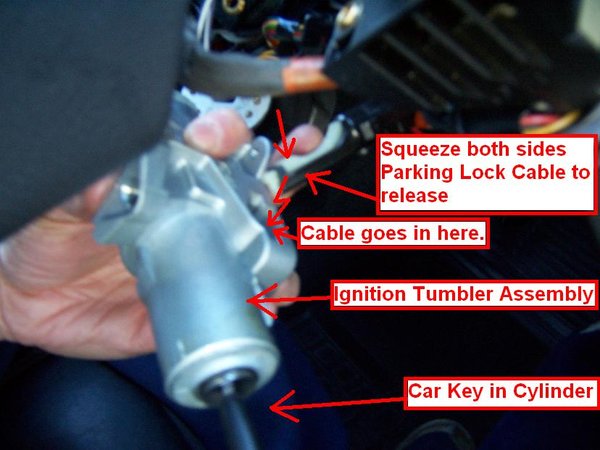
8. If you decide to keep your Ignition Switch (Electrical Portion), then remove it using Torx #20 key, then transfer it to the new Ignition Tumbler Assembly. Note there are a large and a small notch so it can only be aligned 1 way.
However, at 100K, I think it is better to replace both the Ignition Switch (Electrical Portion) and the Ignition Tumbler Assembly.
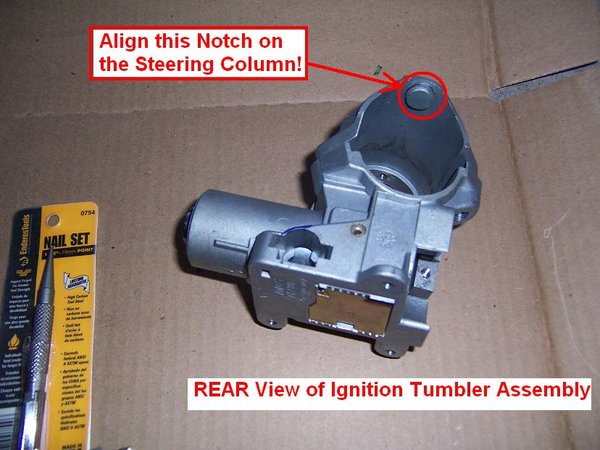
9. Re-assembly is straightforward, make sure the notch on the Ignition Tumbler Assembly lines up with the Steering Column hole before you tighten the Shear Bolts. Again, I did not snap the heads of the Shear Bolts, just finger-tight and snug.
Also make sure the Rubbers around the Turn Signal and Wiper Stalks fit properly on the Upper and Lower Covers.
Tags: 1998, cylinder, DIY, ignition, lock, switch, v70, Volvo
Posted by OurVolvo.com on Jul 20, 2012 in
1999 Volvo V70 ![468-1[1]](https://ourvolvo.com/wp-content/uploads/2012/07/468-11.jpg)
A very special thanks goes to my friend Rob at http://www.volvotips.com/ who helped with priceless advice every step of the way.
BRIEF: While you may enjoy reading the full story of my searches for repair/replacement of my 1999 Volvo V70 Ignition Switch and/or Key Lock Cylinder Problem with Key Rotating Freely at 360 Degrees, it is more probable that you want to fix your car first.
The foremost and cheaper thing to do is check the electric part called the Ignition Switch. The ignition switch is attached with two screws on the LEFT side of the ignition assembly costs about $60 from either the store or the dealer (dealer probably will only bit around $10 more expensive but it will be a genuine part) and is recommended for replacement every 100,000 miles.
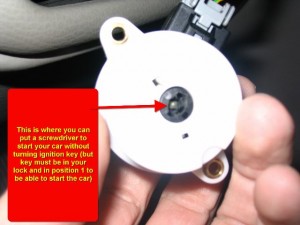
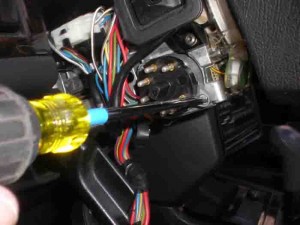
IMPORTANT: You can still start the car even if the switch or the ignition cylinder or something in the brackets is broken. Unscrew the ignition switch and with a key in the ignition, in POSITION II, insert a flat head screwdriver as shown on the picture below. Twist the screwdriver and the car will start.
The ignition switch comes in at least two versions in the newer models and with our luck came with both version in the 1999 V70 which could be determined by taking it OFF (not apart if you don’t want to break it) or by calling Volvo with your VIN number. The part is also available by BWD via Advanced Auto Parts and/or Autozone, if you don’t want to wait on the dealer. The part is NOT yet in their online catalogue, but it is found in the printed master catalog. 1999 Volvo with chassis starting from CH587537 take Part. No CS1054, while chassis up to CH587537 take Part. No CS1057.
I honestly to this day do not know which one goes on the Volvo with chassis No CH587537 and I do hope that as you are reading this you are realizing this is the chassis number of your Volvo. Anyhow, take the switch out and it will be obvious which one you need.
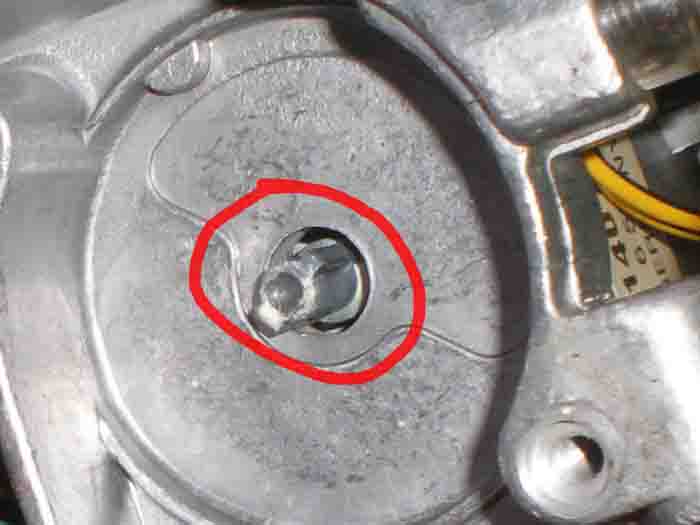
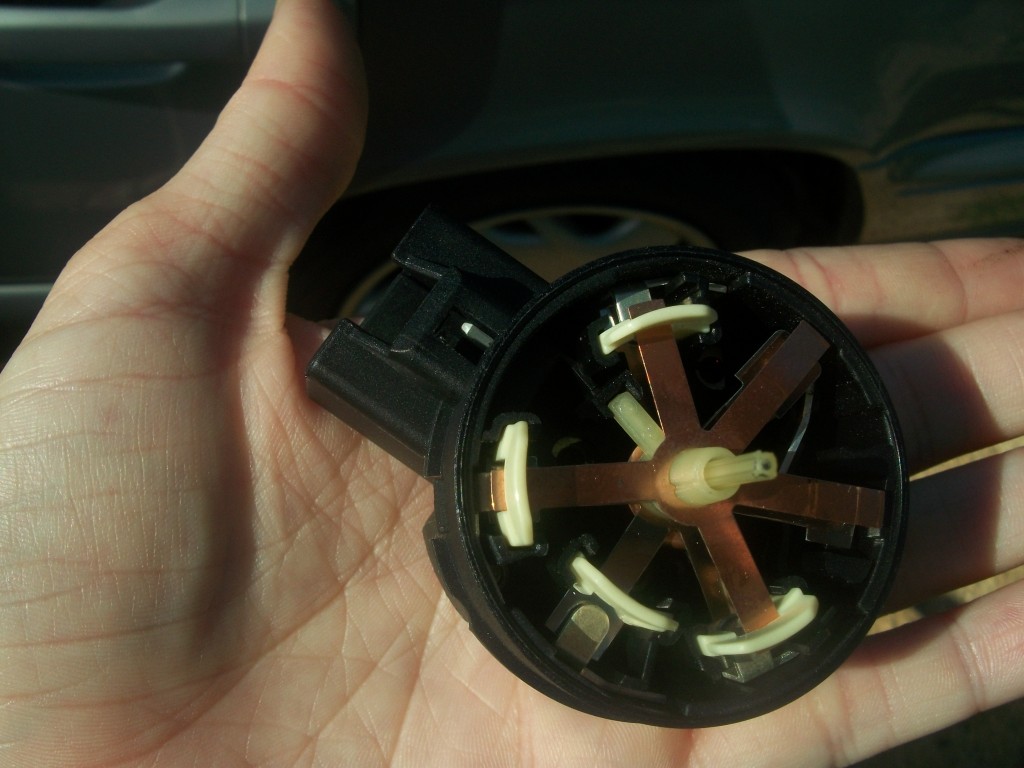
Finally, don’t try to fix this part, as there is not much to fix as you can see on the picture below. Just get a new one and replace it. I tried to fix mine when it was not broken and promptly broke it as a result. Volvo has done a really Mickey Mouse job on this one.
If you are seeing this part of your switch in photo below, you have done what you are NOT supposed to and opened the switch. It is very hard to get everything aligned back and re-shut. But of course curiosity kills the cat – but this is a $75.33 learning experience. Basically think, if you followed the previous directions and started the car with using a screwdriver, this part works fine.
Tags: 1999, 360, 850, degrees, DIY, freely, ignition, Key, part, rotating, S80, switch, v70, Volvo, with
Posted by OurVolvo.com on Jul 15, 2012 in
1999 Volvo V70 ![468-1[1]](https://ourvolvo.com/wp-content/uploads/2012/07/468-11.jpg) A very special thanks goes to my friend Rob at http://www.volvotips.com/ who helped with priceless advice every step of the way.
A very special thanks goes to my friend Rob at http://www.volvotips.com/ who helped with priceless advice every step of the way.
BRIEF: While you may enjoy reading the full story of my searches for repair/replacement of my 1999 Volvo V70 Ignition Switch and/or Key Lock Cylinder Problem with Key Rotating Freely at 360 Degrees, it is more probable that you want to fix your car first. So, first things first in two easy and simple steps:
(1) Make sure the problem is NOT in the electric part called the ignition switch, which is attached with two screws on the LEFT side of the ignition assembly or steering wheel. See how here: 1999 Volvo V70 IGNITON SWITCH (Cost: around $60-$75).
 (2) If it is NOT the ignition switch, you will need to order the whole ignition assembly, which comes with the “coded” key ignition cylinder inserted into the bracket which attaches around the shaft behind your steering wheel. Don’t waste more time, find your VIN number and call to order Volvo part # 8626325 for $225 (+10S&H + Tax) from:
Don Snyder at Darrell Waltrip Volvo Subaru
615-599-6294 (direct) or
1-800-679-6124 (toll free) or
[email protected]
We ordered our part on Tuesday afternoon and received it promptly on Friday morning via FedEx.
Don’t forget to mention ourVolvo.com INTERNET SPECIAL. Now here’s the long story:
Recently, my ignition key on 1999 Volvo V70 started messing up. As the problem persisted for a week or so, the key began freely rotation at 360 degrees without ever catching and starting the car. With such symptoms you can have one or all of the following problems:
(1) Ignition switch, the electric part located on the left of your steering wheal has gone bad. See how to replace it yourself for around $60 or redneck-fix-it here.
(2) Ignition key lock (where your key goes in). This part is precut only by Volvo in Europe by your VIN number. See costs and repairs here:
(3) The metal guillotine, which locks your steering wheel or some other metal part within the ignition assembly, has broken. There’s no way for you to take it apart and fix it. There’s no way for you to take the ignition cylinder out of the assembly. There’s no way to order them separately. They have to be ordered together from Volvo and mounted as described here.
In some rare cases, you may be lucky and have all of the above. Anyway, if you have to change the ignition assembly, it’s recommended to change the ignition switch as well. Especially the older ones with the pin prongs sticking out get oxidized and just cleaning them is not always dependable.
Several tips to remember before you begin:
- If you don’t want to waste your time, just drill the two holding bolts out from the top. The top part of the bracket has no treads.
- It may be difficult to take the top part of the holding bracket without breaking the tiny clear plastic years of the air bag assembly. You can use your old top bracket as it is.
- When you try to put the cover back together, cut your wheal 90 degrees to the left and then the bottom cover will slide in place very easy.
- The wholes for the ignition switch have no treads. Just tighten the screws in and they will snug real good with the soft metal inside the wholes.
- And finally, if it ain’t broken don’t try to fix it!
Now, see how to fix (DIY) the Ignition Switch and replaced the Ignition Key Cylinder and Assembly on our 1999 Volvo V70? Use one of these helpful tutorials depending on your Volvo model. We’ve made copies of them on our website in case they get lost in the forums:
Also a much necessary price quotes and dealer / part store review:
Volvo of Chattanooga
$99 initial diagnostics (if you can get your car towed to them)
$301 ignition cylinder
$1100 ignition column
Volvo of Knoxville (800) 346-8762
$200 ignition cylinder plus $356 labor
Nalley’s Volvo in Atlanta (800) 671-3174 had surprisingly reasonable prices and a very, very helpful part/service adviser, which no other Volvo dealership seemed to offer.
Dayer Volvo of Atlanta (888) 593-3772 gave a quote on parts and repair in the range of $700-900. When I asked for a bit more specific number I was told $840. Seriously? Guess when I’ll go there for a repair – like NEVER. Thumbs down plus BEWARE!
Taska Parts was also recommended on some forums as a cheaper alternative. They order from Volvo and quoted me $230 for the ignition cylinder but after calling and asking 3 times I was still not clear if I am getting just the key cylinder or the whole assembly.
Tags: 1999, 360, cylinder, Darrell Waltrip, degrees, DIY, Don Snyder, freely, ignition, Key, lock, part, problem, rotating, switch, v70, Volvo
Posted by OurVolvo.com on Jan 15, 2012 in
1999 Volvo V70 Detecting a problem with the brake lights on 1999 Volvo V 70 Classic (North American Edition) is easy, especially with the help of our friends at http://www.volvotips.com/

If your light bulbs and fuse are OK, the problem is most probably the self adjustable brake light switch located at the top of your brake pedal. The problem in 99% of cases is there and not in your relay. BTW on the North American Classic model the relay is NOT in the trunk compartment (neither left nor right side, since they are empty) but behind your radio. Start messing with the relay ONLY if you are sure, the problem is not in the (1) fuse, (2) bulbs or (3) the switch.
 The brake light switch on the 1999 Volvo V 70 is a fairly simple device fabricated by Volvo to activate your brake light when the pedal is pressed and deactivates when the pedal is not pressed, in which position the pedal and the switch actually touch.
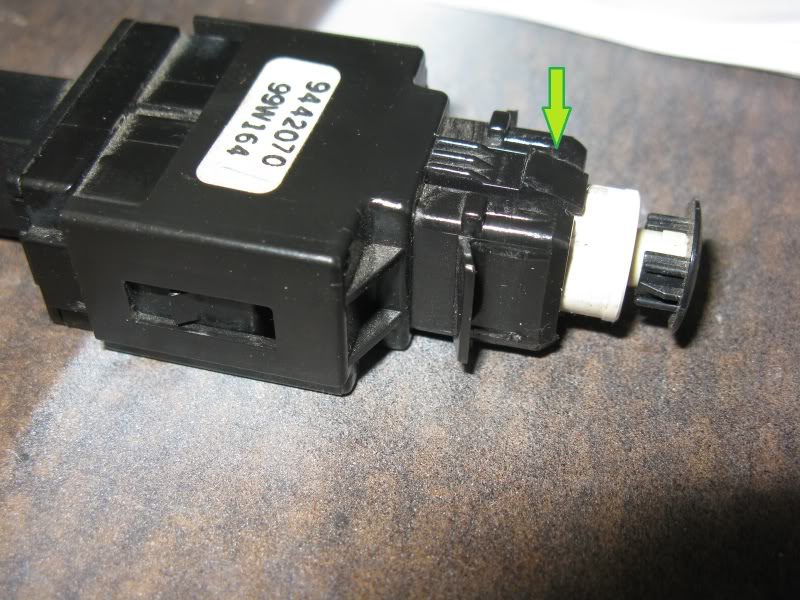
The most probable reasons why your switch is failing, is the small white cylinder which provides the adjustable part of the switch. Often, if you press on the pedal with one hand, you can adjust the white adjustable cylinder with your other hand for a (temporary) fix.
In most cases, however, the small tracks on which the white cylindrical adjuster moves ware out and cannot be restored. The safest thing to do is order a new one at about $40-50 at any auto part store. We got ours at Advanced Auto Parts which has always been helpful in diagnosing our problems. The replacement of the switch is shown on the following picture (and yes, it is possible to remove the switch without breaking it):
It is also possible to take the switch apart. In our situation, the switch had started to fuse together at the two metal points which provide the actual contact for the electric circuit. Yes, you could brush it and clean it to be reused, but do you really want to do that at the risk of your brake lights not working (which BTW is illegal to drive with in North America).

Tags: 1999, adjustable, brake, light, North America, switch, v70, Volvo


![468-1[1]](https://ourvolvo.com/wp-content/uploads/2012/07/468-11.jpg)


 (2) If it is NOT the ignition switch, you will need to order the whole ignition assembly, which comes with the “coded” key ignition cylinder inserted into the bracket which attaches around the shaft behind your steering wheel. Don’t waste more time, find your VIN number and call to order Volvo part # 8626325 for $225 (+10S&H + Tax) from:
 The brake light switch on the 1999 Volvo V 70 is a fairly simple device fabricated by Volvo to activate your brake light when the pedal is pressed and deactivates when the pedal is not pressed, in which position the pedal and the switch actually touch.
