Posted by OurVolvo.com on Nov 20, 2012 in
1999 Volvo V70 First of all, special thanks to DanDan the VolvoMan who we were able to find 3rd row V70 seats through his eBay store. Via his website http://www.resultsautoparts.com, Dan is running a family business which started back in 1972. If you need a Volvo part (or any other car) DanDantheVolvoMan is your man for the job.
Now, there is a YouTube 10-part video series done by a great Polish mechanic, but is quite hard to follow it while installing the seats. You can watch the videos for a reference if you’d like, but this work sheet may be much easier to follow while working.

A. First off, start with the back area:
(1) Remove the spare tire cover. You may later need to remove the spare tire and its plastic nest, so do it now while you are at it.
(2) Remove the two side covers by popping them off with the help of a big screw driver.
(3) Unscrew the two brackets (two screws each) supporting the rear hard cover.
(4) Slide out toward you the rear hard cover. Don’t try to lift it or pop it up. It is fixed by 2-3 brackets and easily slides out.
B. Now move to the rear seat area:
(1) Remove the rear seat arm rest covers. They easily pop out as you pull them out.
(2) Remove the two vents. They pop and slide out. The are not broken but factory precut so you can put the seat belt in them. Be careful that if you pry on them when cold they could break.
(3) Remove part of the door seal gasket to uncover the plastic side cover where the door closes.
(4) Then remove the plastic rectangle on the top where your seat belt will be attached and then the ceiling side plastic cover.
C. You are ready to install the seat belts:
(1) Start by unfolding some of the seat belt giving it enough slack so you can install it. If it is locked, you have to hold it straight and gently pull. It may take several pulls till you get hang of it.
(2) Fit the belt mechanism correctly on the frame and fix the bolt.
(3) Extend the belt to the ceiling and do the same with the belt hanger.
(4) You can now safely put back in place all plastic covers, the door seals and the rear seat arm rests.
D. Seat belt floor locks
(1) Fit the large T-shape metal frame in the provided hole to your left which is fixed with two bolts to the frame (one on your right side and on the bottom of the mechanism).
(2) You will need to mount the two brackets, which you removed in the beginning, to the back side of the backrest with the provided 3 small screws for each of them.
(3) You are now ready to slide the backrest piece into place.
(4) Once it is in position, raise it and mount the two lower brackets to the car frame. They may need to be pressed firmly and bent a little to fit just right over the two holes.


E. Last but not least:
(1) The small plastic lock may take most of your time, but it is important to tweak it just right so your 3rd row Volvo seat may securely lock when raised.
(2) You will need to cut just right through the vinyl seat cover after finding the small opening on your back right side of the seat just bellow the head rests.
(3) You will need two small ears on the bottom of your cut for the piece to fit just right.
(4) Once finished with the cutting, install the plastic piece starting by pressing first on the top and then on the bottom until it fits just right. Once in, slide it upward to snug and lock. If it does not lock your 3rd row seat will not be secure.
(5) Try if it works by raising your 3rd row seat. If installed properly, the lock sticks should lock securely and then easily release when the latch is pressed. If you run into the problem where the latch will not release properly you may need to cut a bigger hole.

F. You may also want to change the seat carpet covers if they are worn out.
(1) The one with the seat is attached with metal brackets to the hard cover and easily pops out when pulled firmly and then you have but a few screws to deal with while transferring the seats.
(2) The back rest, however, will need some modifications as the two head rests have to be attached to it, but only after you have cut through the wood in order to install the locking mechanism. Without it, your 3rd row seat will have nowhere to lock in order to stay in the sitting position.
Tags: 1999, 3rd, installing, row, seats, v70, Volvo
Posted by OurVolvo.com on Nov 15, 2012 in
1999 Volvo V70 So we attended the car show around 7:30 pm because the flyer said that it was until 9:oo pm, BUT when we got there everybody was leaving. We saw more antique cars pass us on the way there than we actually did on Main Street. It was more like a Cruise-in/Cruise-out type of deal. So next time, we will have to get there early. These are the cars that stayed true and represented with pride. Unfortunately we did not even get a good pic of ourvolvo.com.
Tags: car, cruisein, cruiseout, main, show, street
Posted by OurVolvo.com on Oct 31, 2012 in
Volvo V70 XC 
Tags: halloween, happy
Posted by OurVolvo.com on Sep 15, 2012 in
1999 Volvo V70 ![1999-volvo-v70[1]](https://ourvolvo.com/wp-content/uploads/2012/09/1999-volvo-v701-1024x727.jpg)
Tags: auto, draft
Posted by OurVolvo.com on Sep 1, 2012 in
1999 Volvo V70 By MOM
SOURCE: http://www.matthewsvolvosite.com/forums/viewtopic.php?f=1&t=13514
I can’t start my car, the key won’t turn more than position I.
Tried to wiggle the steering wheel, shift override is working ok, button on the shift knob is popped out, nothing wrong I can see.
I unscrewed the steering cover this morning, and I removed the electrical part of the switch. With the key in position I, I started up the car fine with a screwdriver and was able to drive it correctly.


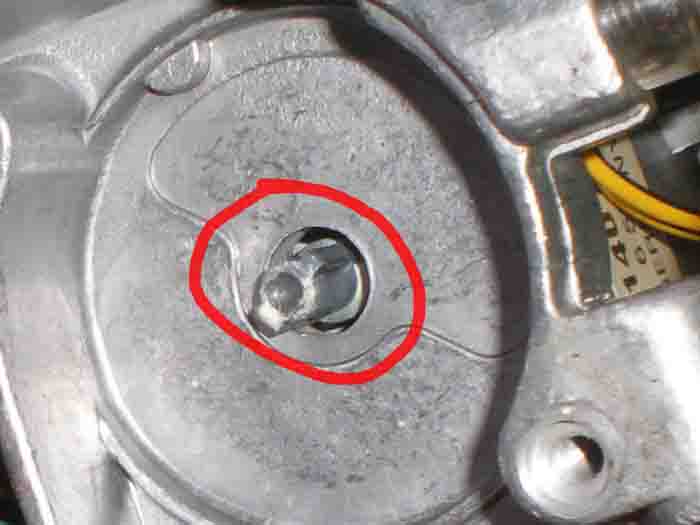
Today I decided to find what was the problem with my cylinder lock. I tought maybe I could repair it, but it is impossible. The broken part is made of cast aluminum and is very small. This part is a kind of “guillotine” that slides up and down inside the mechanism. Mine was missing a guide pin, preventing it to move freely. The cause is definitely the steering wheel beeing turned to the left, forcing the steering lock from the right, and also the guillotine on its most vulnerable position. I’m sure it could happen on a brand new lock. Look at those pictures and you’ll understand.


Tags: auto, draft
Posted by OurVolvo.com on Aug 20, 2012 in
1999 Volvo V70 How To Change The Ignition Switch on a Volvo 850
By NYC-Volvo
SOURCE: http://www.matthewsvolvosite.com/forums/viewtopic.php?f=1&t=37398
I just changed the ignition switch in my 1996 850 R, and I’d like to share the process with you. I’ve taken photos to make it easier for you to follow along. I rate this job as easy. I am not a mechanic, but I am handy. This repair took me 18 minutes from start to finish. So that 18 minutes includes the time it took me to gather my tools, go outside to the car, do the repair, take photos, clean everything up, and put my tools away. 18 minutes… it was much quicker that I expected.
Tools you will need
· Slotted screwdriver
· #25 Torx driver (the shank must be at least 3.75”)
Prepare your work area
· Move the seat back
· Adjust the steering column all the way out and down
· Make sure the engine is not running and the key is in the off position
Instructions
The following photo shows the underside of the steering column…
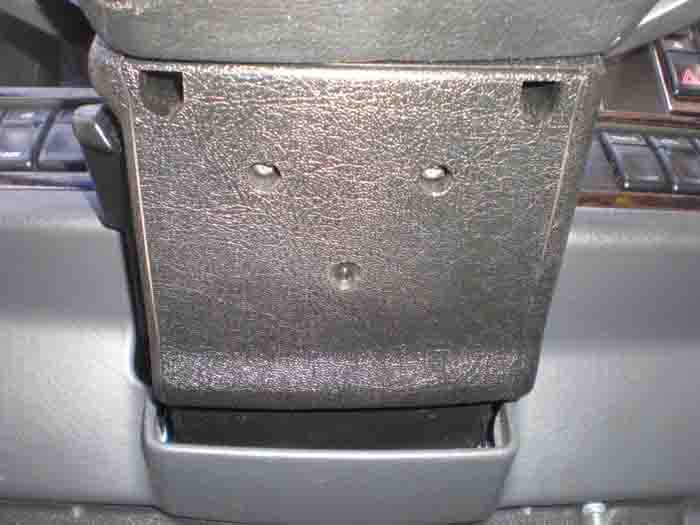
There are four #25 torx screws that hold both the lower and the upper cover to the steering column. You cannot see the upper cover in this photo, all four screws are accessed via the lower cover. The red circles show where the screws are for the removal of the upper cover. The yellow circles show the screws that hold the lower cover. Please take note that the screws for the upper cover are recessed, and you will need a #25 torx driver with a minimum of 3.75 inches of shank to reach in.

First remove the two screws holding the upper cover, and lift the upper cover up to remove it…
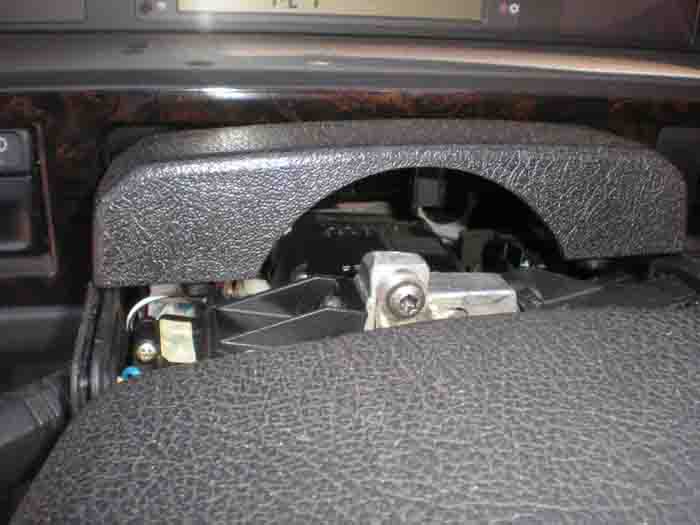
Remove the two screws holding the lower cover. To remove the lower cover, you will need to lift it over the ignition key area as you pull the cover down. Once you have the lower cover off, you will have the necessary access needed for this job…
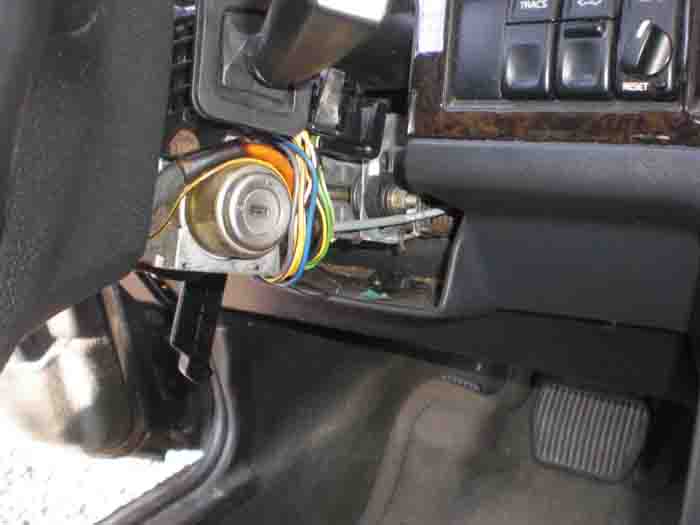
You are now ready to change the ignition switch…
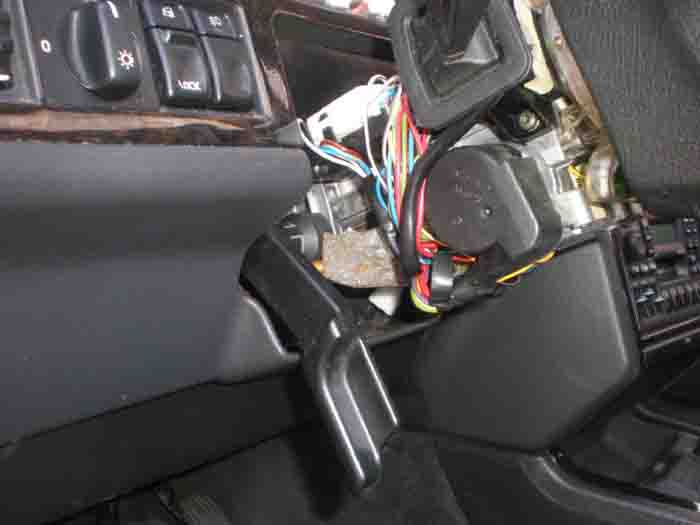
Next, remove the wiring conncetor from the ignition switch. I have circled the wiring connector in red…
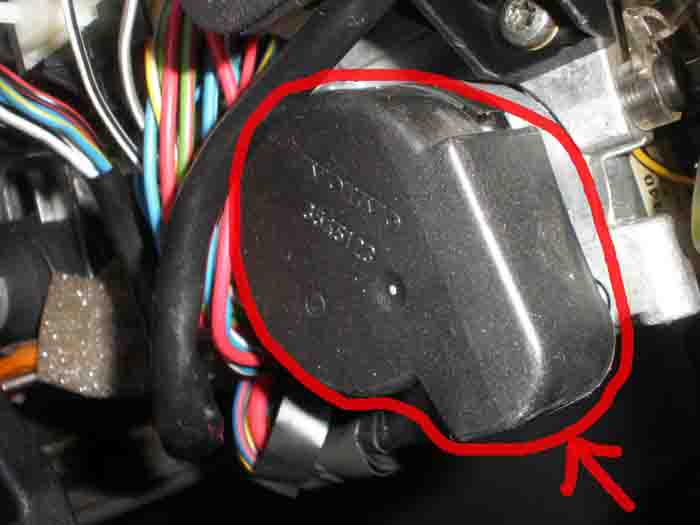
Hold the connector firmly and pull it out with a light rocking motion. Be careful not to damage the connector…
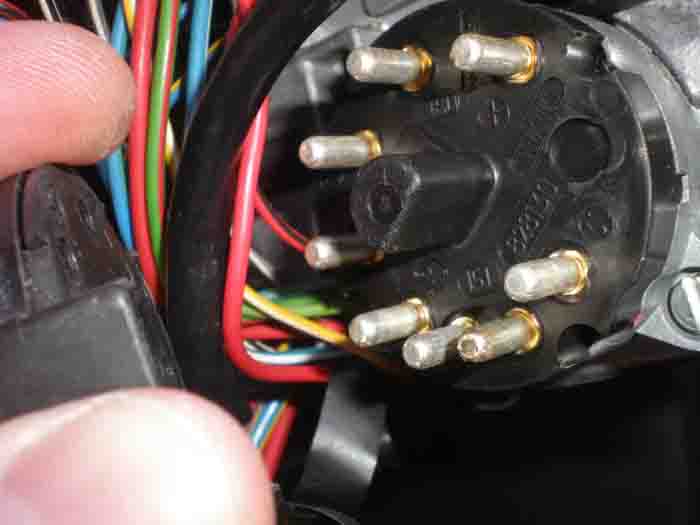
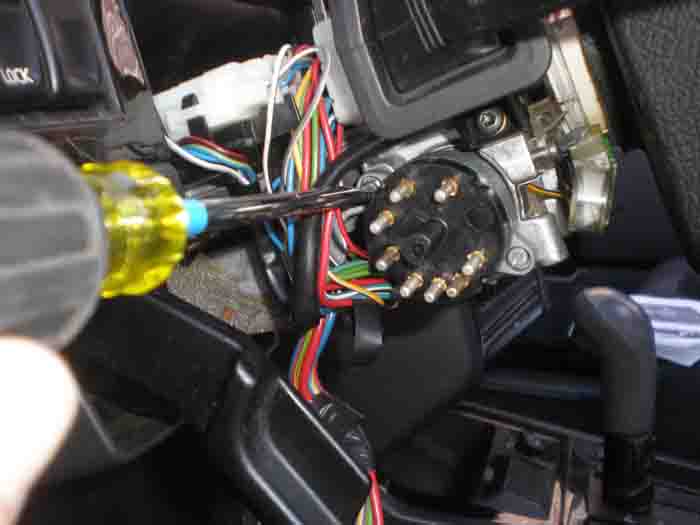
Next, using a slotted screwdriver, remove each of the two screws holding the switch in place…
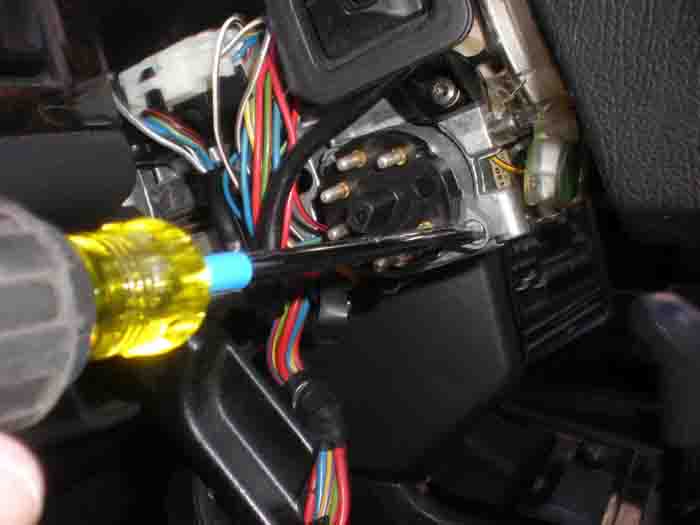
You are now ready to install the new switch. You need to ensure that the switch lines up with the position of the key. To do this, put the ignition key in the keyhole, put the new ignition switch in place and hold it witih one hand (do not screw it in yet), turn the key with the other hand until the key and the switch line up. You will know when it is lined up becuase the new switch will be seated firmly in place. Once everything is lined up, continue to hold the new switch in place, and remove the key from the ignition…
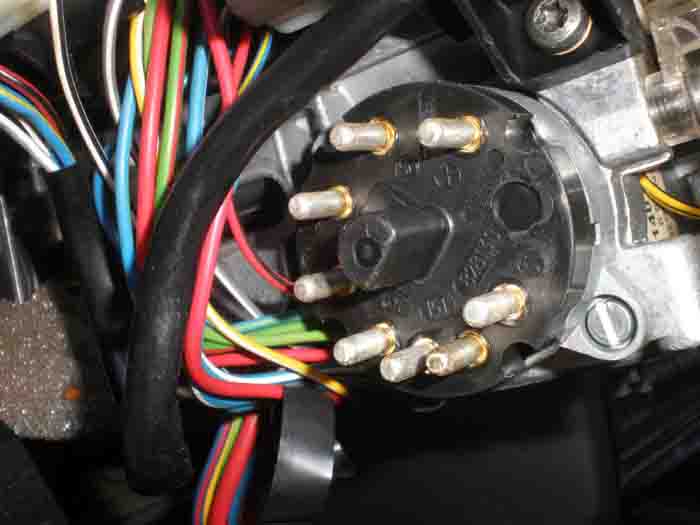
Secure the ignition switch with the two screws…
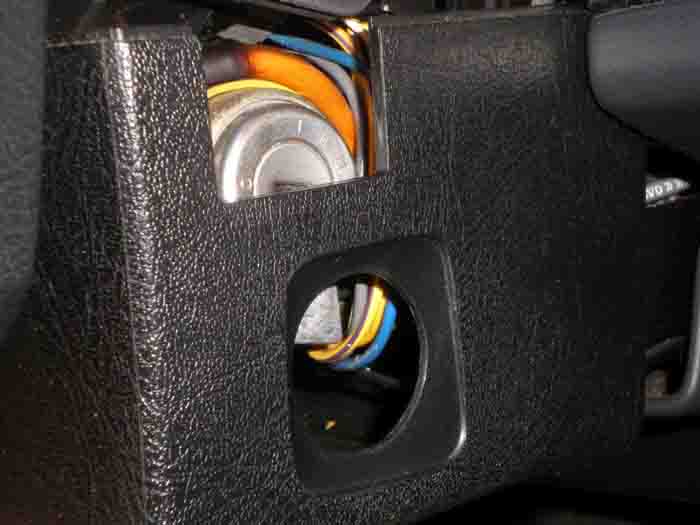
Reinstall the lower steering column cover. Be careful to get it into place over the ignition, and be sure to line up the rubber from the directional stalk and the wiper stalk. Fasten with two torx screws…
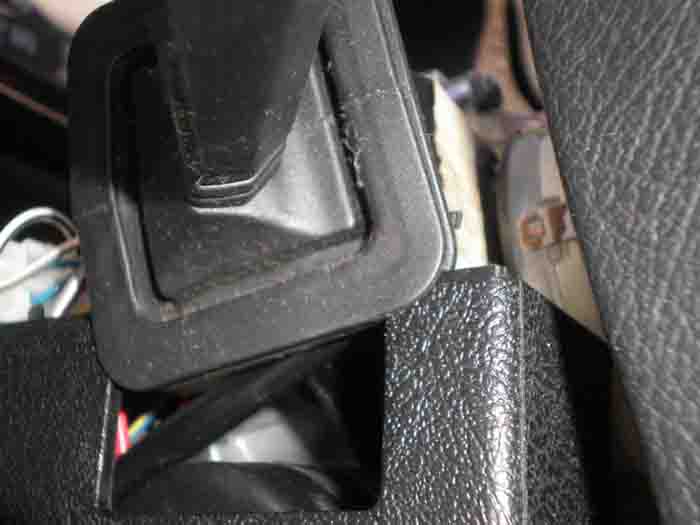
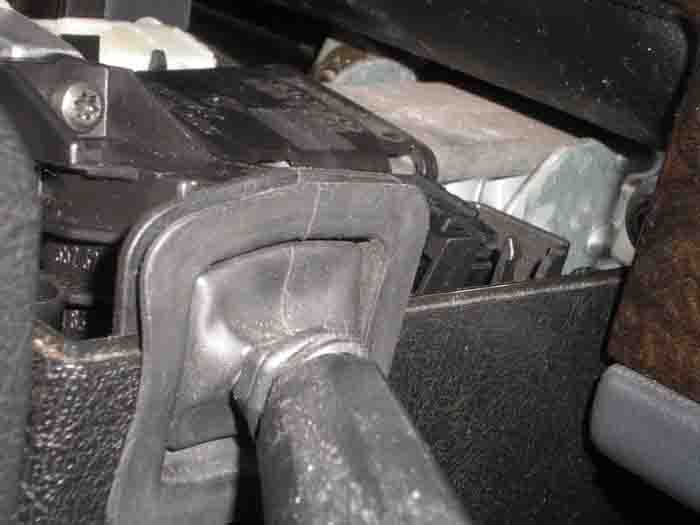
Reinstall the upper steering colum cover. Be sure to slide the rear of the cover in first and make sure it “hinges” (see below) so it will seat properly. Install the two screws to secure it in place…
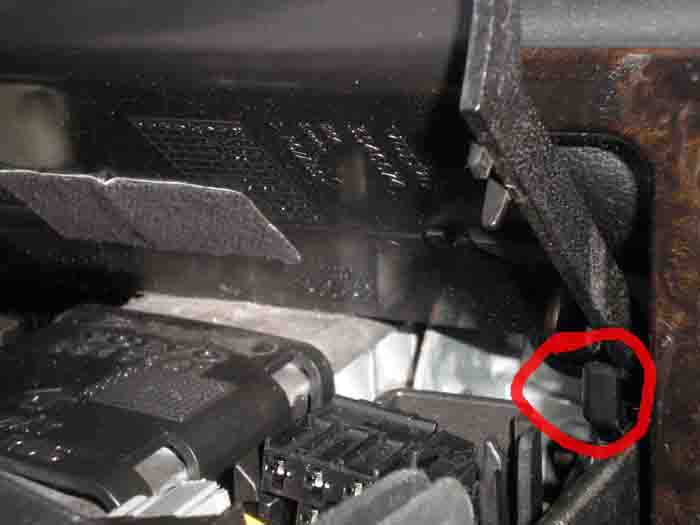
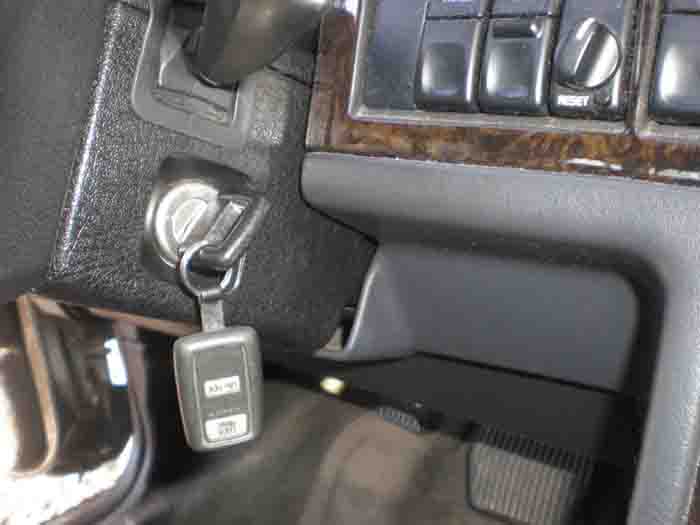
Tags: 850, ignition, replacement, switch, Volvo
Posted by OurVolvo.com on Aug 5, 2012 in
1999 Volvo V70 By: cn90
SOURCE: http://www.matthewsvolvosite.com/forums/viewtopic.php?f=1&t=34472
Car is 1998 Volvo V70 with 106K miles.
– Symptoms: sometimes cannot crank the engine, after wiggling the key a few times, then I can start the engine. It was intermittent, then it became permanent.
– Key can turn to Position I and Position II but not Position III (crank).
– Initially I thought it was the Ignition Switch (Electrical Portion to the LEFT of Steering Column), which was replaced but same symptoms! It turned out to be the Ignition Tumbler Lock (where you insert the key).
ATT: If you replace the Ignition Tumbler Lock (where you insert the key), there is NO need to remove the Steering Wheel at all! Read on.
1. Igntition Switch (Electrical Portion is PN 9447804, $50 at Volvo dealer. Do not use aftermarket part).
2. Ignition Tumbler Assembly (where you insert the key, Volvo PN is 8626325). I bought it for $210 from (ordered Monday and got it by Fedex on Saturday, wow fast service!):
Don Snyder
Darrell Waltrip Volvo Subaru
615-599-6294 Direct
Tel. 1-800-679-6124
Fax 615-599-6253
[email protected]
3. Tools:
– Torx set
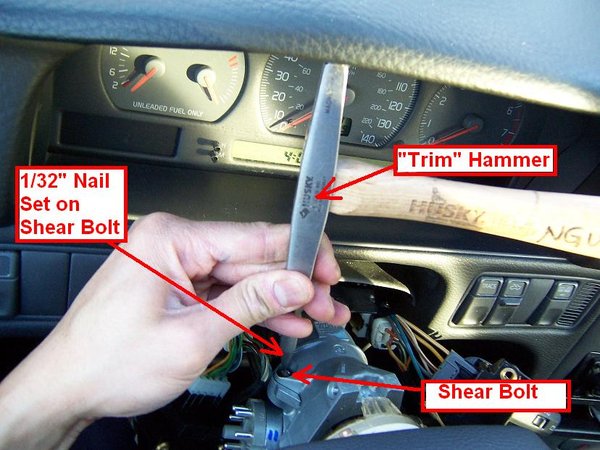
– “Trim” Hammer (this hammer is used for carpentry trim job) is useful in this tight space
– 1/32” Nail Set
– Flat Screwdriver.
FYI, 1998 and earlier models probably have no anti-theft chip in the key. I connected the Ignition Switch (Electrical Part on the LEFT of Steering Column) to the connector and use a flat screwdriver (in the location labeled “Slot”) to crank and the car starts right up.
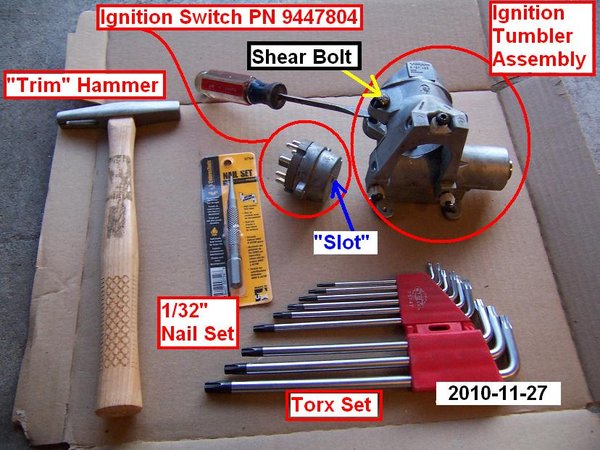
4. Shear Bolts are supplied with new Ignition Tumbler Lock Assembly. For those not familiar with Shear Bolts: these are used during assembly at factory, once the head on the Shear Bolt is tightened to a certain torque, the outer head snaps off, leaving a round inner head, making it difficult for thieves to remove. When you buy the Ignition Tumbler Lock Assembly, the Shear Bolts are supplied with it.
– During re-installation, I simply tightened the Shear Bolts snug without snapping the head off just in case I want to remove them later.
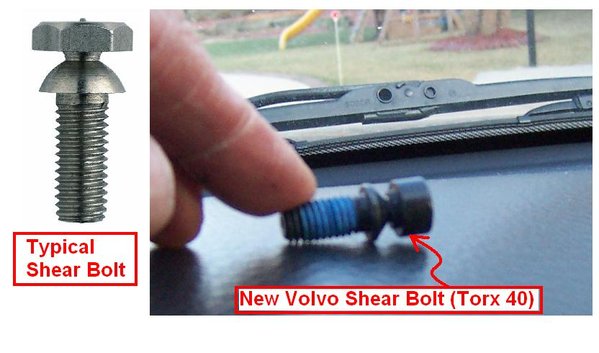
5. Have a look at the first picture above to be familiar with the setup:
– The LEFT side of the Ignition Assembly is the Electrical Portion of the Ignition: it turns I, II and III (crank).
– The RIGHT side of the Ignition Assembly (where you insert the key) can only be turned with the proper key and has a cable to control so you cannot remove the key if the car is not in Park. The RIGHT side turns the LEFT side via a flat piece of steel, pretty much similar to your lock at home.
Procedures:
1. Disconnect Battery Ground Cable for safety reasons.
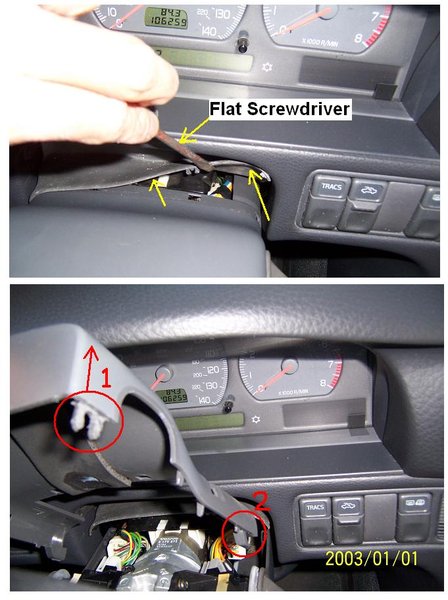
2. Use a flat screwdriver to lift off the rubber trim, then lift the Upper Cover close to SW upward (#1), then slide it toward you so it slides out of the hook (#2).
The Lower Cover is secured by three (3) Torx #25 bolts. When removing the Lower Cover, pay attention to the part around the Lighted Ring: tug the Lower Cover outward a bit so it clears the Lighted Ring then remove it.
3. Remove Turn Signal Stalk and Wiper Stalk: Each Stalk is held by two (2) Torx #25 bolts.
4. Now you can see the Shear Bolt round head. At factory, the force used to tighten the Shear Bolt was not much, so with the Nail Set you can “chisel” it out. Angle the Nail Set in such a way that it angles about 45 degrees and tap it with the “trim” Hammer Counter-Clockwise to remove the Shear Bolt.
This is why you do NOT need to remove the Steering Wheel when replacing the Ignition Tumbler Lock Assembly.
5. Use a flat screwdriver to gently disconnect the Connector to the Ignition Switch (left side of Steering Column).
Disconnect the three Torx Bolts holding the Horn/Air Bag Ring (aka “Clockspring”).
Once the Shear Bolts are removed, the Cylinder Lock Assembly will fall down, so support it with your knees.
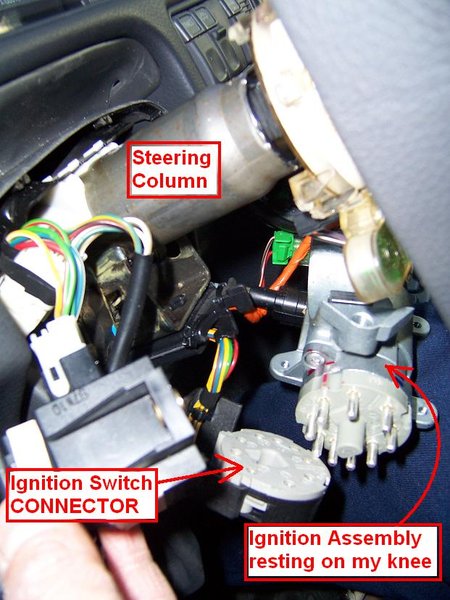
6. Now disconnect the Lighted Ring connector then remove the Lighted Ring from the Assembly.
7. To remove the Parking Release Cable: squeeze both sides of the tabs and use a flat screwdriver to gently pry it out. But first use a Sharpie to mark the depth of insertion of this Parking Release Cable so you know how much to insert it to the new Assembly. I think the key needs to be in position II to insert this Parking Release Cable.
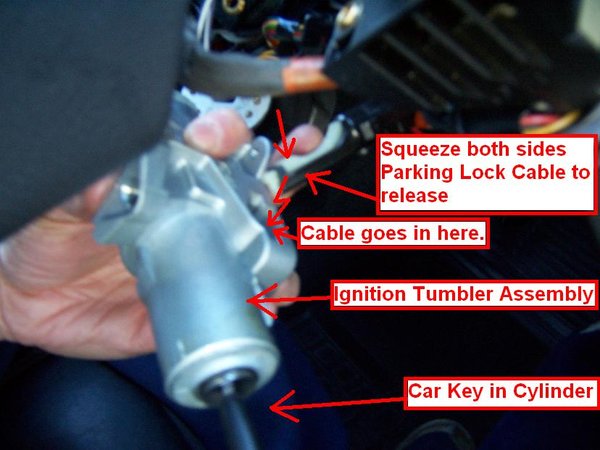
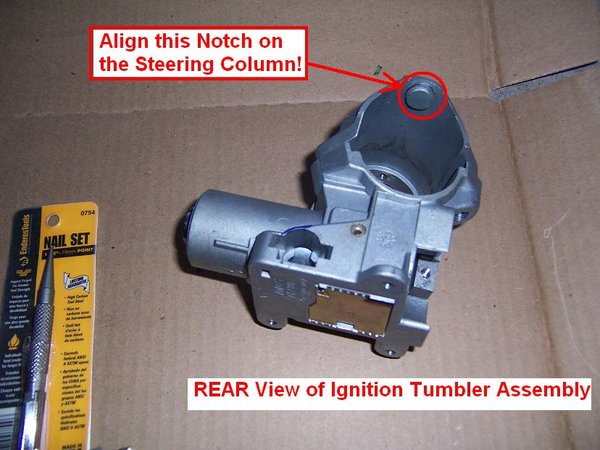
8. If you decide to keep your Ignition Switch (Electrical Portion), then remove it using Torx #20 key, then transfer it to the new Ignition Tumbler Assembly. Note there are a large and a small notch so it can only be aligned 1 way.
However, at 100K, I think it is better to replace both the Ignition Switch (Electrical Portion) and the Ignition Tumbler Assembly.
9. Re-assembly is straightforward, make sure the notch on the Ignition Tumbler Assembly lines up with the Steering Column hole before you tighten the Shear Bolts. Again, I did not snap the heads of the Shear Bolts, just finger-tight and snug.
Also make sure the Rubbers around the Turn Signal and Wiper Stalks fit properly on the Upper and Lower Covers.
Tags: 1998, cylinder, DIY, ignition, lock, switch, v70, Volvo
Posted by OurVolvo.com on Jul 25, 2012 in
1999 Volvo V70 SOURCE: http://volvospeed.com/volvo_repairs_how_tos/miscellaneous_repairs_tips/replacing_cylinder_lock.html
Published on February 2, 2011 by Mr. Winkey
Tools Needed: Torx Paint Pen Picks & Sockets Bits Drill
This is a top level job and must be done with great care! If you do not feel comfortable or are not 100% sure of your skills I would highly recommend not attempting this job. Sometimes it is just better and more cost effective to pay a professional than to make a mess and have to pay one double!
Start by disconnecting the battery.
Remove the steering column covers with a 20mm torx driver.
Remove the ignition switch,wiper switch and turn signal switches all are 25mm torx.
Now remove the air bag module. You will need a long 30mm torx driver as shown below.

Unplug the module and lay it outside the vehicle with the back(metal part) laying flat on the ground.

Now remove the 18mm bolt securing the steering wheel. After the bolt is removed I paint mark the wheel to the column splines for alignment reference. Before you remove the wheel you must pin the air bag contact reel (I use a small phillips screwdriver) There is a small dimple behind the contact reel hole for proper alignment. If you accidentally release the contact reel the yellow tag attached to the wire gives specific instructions on how to re-align it. But we want to avoid this.
With the contact reel pinned you may now slide your steering wheel off.
The below picture pretty much shows all that is described here.

Now remove the torx screws securing the contact reel unplug and remove that as well. Keeping the pinning device(screwdriver intact)

There are numerous ways to seperate the 2 pieces of the lock cylinder, I prefer to drill them out and this is the method that I’m going to show. The below picture(a bit blurry) shows a pen(on the left) pointing to the one shear bolt that must be drilled out. You must then go to the other side and drill that one out as well. It makes no diffrence which side you start with they just both have to be removed. I put a small amount of grease on the 3/8″ drill bit to try and hold the metal shavings. I would recommend covering the dash and the floor as well to retain the metal shavings.

The picture below shows the LH shear bolt drilled through and the 2 pieces are seperated. Now I’m drilling the RH one.

Finish drilling through and remove the 2 pieces as shown. Notice the RH one is not completly drilled through but enough to bend it upward to clear the column.


With the old one out of the way wipe off any residual metal debris and install your new lock cylinder. The 2 bolts supplied are shear bolts as well(meaning the tops are meant to snap off when they are tightened) so care must be taken not to cross thread these. Position your lock cylinder and install your new shear bolts. I make both sides lightly snug then I go back and tighten them until the top of the shear bolt snaps off. The shear bolts are 40mm torx.
The below picture shows the new lock cylinder in place and now you are ready to reverse procedure and reassemble.

Tags: 99, c70, cylinder, including, lock, S80, up, v70, xc
Posted by OurVolvo.com on Jul 20, 2012 in
1999 Volvo V70 ![468-1[1]](https://ourvolvo.com/wp-content/uploads/2012/07/468-11.jpg)
A very special thanks goes to my friend Rob at http://www.volvotips.com/ who helped with priceless advice every step of the way.
BRIEF: While you may enjoy reading the full story of my searches for repair/replacement of my 1999 Volvo V70 Ignition Switch and/or Key Lock Cylinder Problem with Key Rotating Freely at 360 Degrees, it is more probable that you want to fix your car first.
The foremost and cheaper thing to do is check the electric part called the Ignition Switch. The ignition switch is attached with two screws on the LEFT side of the ignition assembly costs about $60 from either the store or the dealer (dealer probably will only bit around $10 more expensive but it will be a genuine part) and is recommended for replacement every 100,000 miles.
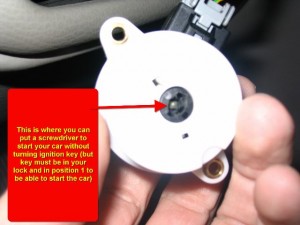
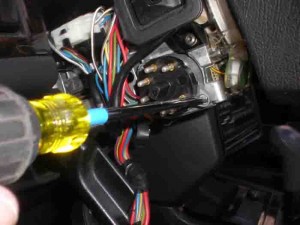
IMPORTANT: You can still start the car even if the switch or the ignition cylinder or something in the brackets is broken. Unscrew the ignition switch and with a key in the ignition, in POSITION II, insert a flat head screwdriver as shown on the picture below. Twist the screwdriver and the car will start.
The ignition switch comes in at least two versions in the newer models and with our luck came with both version in the 1999 V70 which could be determined by taking it OFF (not apart if you don’t want to break it) or by calling Volvo with your VIN number. The part is also available by BWD via Advanced Auto Parts and/or Autozone, if you don’t want to wait on the dealer. The part is NOT yet in their online catalogue, but it is found in the printed master catalog. 1999 Volvo with chassis starting from CH587537 take Part. No CS1054, while chassis up to CH587537 take Part. No CS1057.
I honestly to this day do not know which one goes on the Volvo with chassis No CH587537 and I do hope that as you are reading this you are realizing this is the chassis number of your Volvo. Anyhow, take the switch out and it will be obvious which one you need.
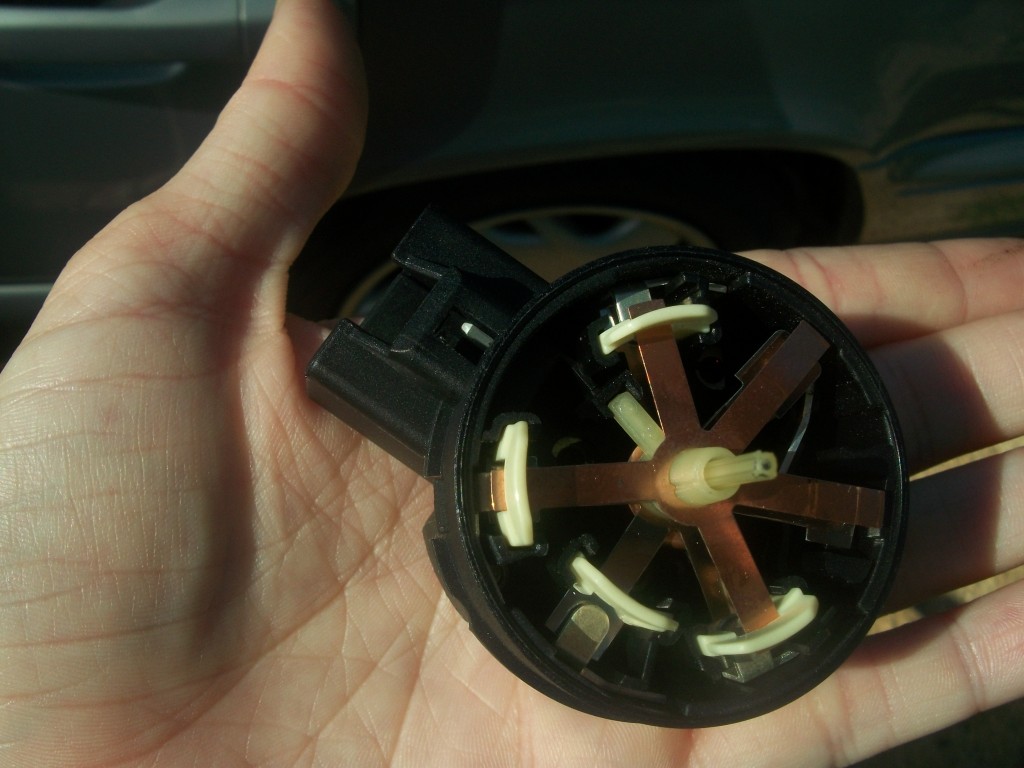
Finally, don’t try to fix this part, as there is not much to fix as you can see on the picture below. Just get a new one and replace it. I tried to fix mine when it was not broken and promptly broke it as a result. Volvo has done a really Mickey Mouse job on this one.
If you are seeing this part of your switch in photo below, you have done what you are NOT supposed to and opened the switch. It is very hard to get everything aligned back and re-shut. But of course curiosity kills the cat – but this is a $75.33 learning experience. Basically think, if you followed the previous directions and started the car with using a screwdriver, this part works fine.
Tags: 1999, 360, 850, degrees, DIY, freely, ignition, Key, part, rotating, S80, switch, v70, Volvo, with
Posted by OurVolvo.com on Jul 15, 2012 in
1999 Volvo V70 ![468-1[1]](https://ourvolvo.com/wp-content/uploads/2012/07/468-11.jpg) A very special thanks goes to my friend Rob at http://www.volvotips.com/ who helped with priceless advice every step of the way.
A very special thanks goes to my friend Rob at http://www.volvotips.com/ who helped with priceless advice every step of the way.
BRIEF: While you may enjoy reading the full story of my searches for repair/replacement of my 1999 Volvo V70 Ignition Switch and/or Key Lock Cylinder Problem with Key Rotating Freely at 360 Degrees, it is more probable that you want to fix your car first. So, first things first in two easy and simple steps:
(1) Make sure the problem is NOT in the electric part called the ignition switch, which is attached with two screws on the LEFT side of the ignition assembly or steering wheel. See how here: 1999 Volvo V70 IGNITON SWITCH (Cost: around $60-$75).
 (2) If it is NOT the ignition switch, you will need to order the whole ignition assembly, which comes with the “coded” key ignition cylinder inserted into the bracket which attaches around the shaft behind your steering wheel. Don’t waste more time, find your VIN number and call to order Volvo part # 8626325 for $225 (+10S&H + Tax) from:
Don Snyder at Darrell Waltrip Volvo Subaru
615-599-6294 (direct) or
1-800-679-6124 (toll free) or
[email protected]
We ordered our part on Tuesday afternoon and received it promptly on Friday morning via FedEx.
Don’t forget to mention ourVolvo.com INTERNET SPECIAL. Now here’s the long story:
Recently, my ignition key on 1999 Volvo V70 started messing up. As the problem persisted for a week or so, the key began freely rotation at 360 degrees without ever catching and starting the car. With such symptoms you can have one or all of the following problems:
(1) Ignition switch, the electric part located on the left of your steering wheal has gone bad. See how to replace it yourself for around $60 or redneck-fix-it here.
(2) Ignition key lock (where your key goes in). This part is precut only by Volvo in Europe by your VIN number. See costs and repairs here:
(3) The metal guillotine, which locks your steering wheel or some other metal part within the ignition assembly, has broken. There’s no way for you to take it apart and fix it. There’s no way for you to take the ignition cylinder out of the assembly. There’s no way to order them separately. They have to be ordered together from Volvo and mounted as described here.
In some rare cases, you may be lucky and have all of the above. Anyway, if you have to change the ignition assembly, it’s recommended to change the ignition switch as well. Especially the older ones with the pin prongs sticking out get oxidized and just cleaning them is not always dependable.
Several tips to remember before you begin:
- If you don’t want to waste your time, just drill the two holding bolts out from the top. The top part of the bracket has no treads.
- It may be difficult to take the top part of the holding bracket without breaking the tiny clear plastic years of the air bag assembly. You can use your old top bracket as it is.
- When you try to put the cover back together, cut your wheal 90 degrees to the left and then the bottom cover will slide in place very easy.
- The wholes for the ignition switch have no treads. Just tighten the screws in and they will snug real good with the soft metal inside the wholes.
- And finally, if it ain’t broken don’t try to fix it!
Now, see how to fix (DIY) the Ignition Switch and replaced the Ignition Key Cylinder and Assembly on our 1999 Volvo V70? Use one of these helpful tutorials depending on your Volvo model. We’ve made copies of them on our website in case they get lost in the forums:
Also a much necessary price quotes and dealer / part store review:
Volvo of Chattanooga
$99 initial diagnostics (if you can get your car towed to them)
$301 ignition cylinder
$1100 ignition column
Volvo of Knoxville (800) 346-8762
$200 ignition cylinder plus $356 labor
Nalley’s Volvo in Atlanta (800) 671-3174 had surprisingly reasonable prices and a very, very helpful part/service adviser, which no other Volvo dealership seemed to offer.
Dayer Volvo of Atlanta (888) 593-3772 gave a quote on parts and repair in the range of $700-900. When I asked for a bit more specific number I was told $840. Seriously? Guess when I’ll go there for a repair – like NEVER. Thumbs down plus BEWARE!
Taska Parts was also recommended on some forums as a cheaper alternative. They order from Volvo and quoted me $230 for the ignition cylinder but after calling and asking 3 times I was still not clear if I am getting just the key cylinder or the whole assembly.
Tags: 1999, 360, cylinder, Darrell Waltrip, degrees, DIY, Don Snyder, freely, ignition, Key, lock, part, problem, rotating, switch, v70, Volvo





![1999-volvo-v70[1]](https://ourvolvo.com/wp-content/uploads/2012/09/1999-volvo-v701-1024x727.jpg)


![468-1[1]](https://ourvolvo.com/wp-content/uploads/2012/07/468-11.jpg)


 (2) If it is NOT the ignition switch, you will need to order the whole ignition assembly, which comes with the “coded” key ignition cylinder inserted into the bracket which attaches around the shaft behind your steering wheel. Don’t waste more time, find your VIN number and call to order Volvo part # 8626325 for $225 (+10S&H + Tax) from: