Posted by OurVolvo.com on Oct 10, 2016 in
1999 Volvo V70 Years ago when we first got out Volvo V70 we published this DIY quick fix for the sticking ABS that causes the driver all sorts of other problems. But the truth of the matter is that it is just a quick fix.
As time progresses, the ABS unit performance will not improve. On the contrary, every time the temperature begins affecting the unit or the spaces, new problems would occur. We dealt with it for a while with just replacing the spacer with a new one (folded empty Wal-mart gift card), but this was also just a temporary fix.

There is an easy DIY permanent fix by getting a refurbished ABS module for under $100 and replace it yourself for under an hour. After a couple of years of dealing with ABS failure, which blocks the dash board instruments, brings on the check engine light, overrides the 4th gear and puts the whole car in a limp mode where you cannot go over 30 mph, we finally resorted to a permanent fix.
Matt Pollack of Midwest ABS Exchange and Repair provided a fully working and tested refurbished ABS Volvo module which has now worked without any problems for 3 months on out 1999 V70 station wagon. While the ABS plastic spacer would provide you with a quick temporary fix, it is well worth investing the money to fix your ABS permanently.
Tags: abs, DIY, fix, permanent, sticking, unit, v70, Volvo
Posted by OurVolvo.com on Oct 9, 2016 in
1999 Volvo V70 1. Alternator bearing ceases every 30 – 40,000 miles or after long periods of not driving:
- Use lots of PB Blaster and if you are lucky it may start turning again
- Do not bring a torch under there – it will catch everything on fire
- Do not beat with a hammer. There’s no beating it out of place.
- And now that you are in this boat, do not get an auto store “new” alternator that will go bad in less than 50,000 miles again
2. In some cases (like mine) the bottom nut and/or alternator bolt ceases and cannot be undone for the life of it:
- Your local repair shop will charge you $55-77 to remove it
- If you look under there, you will see the nut could be reached properly only after taking the front driver side tire off
- In my case no power wrench (electric or compressor) worked – did not even budge it
- Use a longer extension to reach from outside the fender where you can attach a longer ratchet and push with your body forward
- If you are lucky the nut will come off. But even if it breaks proceed to step 3
3. Reach with a thinner size 14 wrench and unscrew one of the two nuts that hold the massive alternator bracket. The other one you can reach with a power or regular wrench
4. If your long bolt that goes through the alternator housing and holds it to bracket has ceased like mine did, there’s no taking / beating / torching it out. Drill it out very carefully and release from the bracket
5. Once again, the store “new” alternators at $70 are rebuilt and refurbished. So, just go to your local alternator repair shop and get your original Honda CRX alternator rebuilt there for $30-40 preferably with American made bearing, magnets and brushes inside
After you have done all of the above:
(1) installing the bracket first
(2) then run the long bolt and
(3) the newly rebuilt alternator should take less than half an hour
(4) fasten the adjuster bolt on the top of the alternator
(5) connect the (6) ground and then (7) the electric connector
(8) only after properly fastened, grounded and connected re-connect the battery and you are good to go
In some rare cases (like it was mine) the check engine light may come on. Check and replace any blown fuses. Disconnecting the battery for 20-30min. recycles the computer and removes the check engine light too.
Tags: 1989, 5, alternator, CRX, DIY, Honda, majorly, replacement, wrong
Posted by OurVolvo.com on Aug 22, 2016 in
1999 Volvo V70
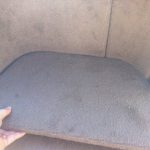
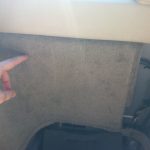
- Remove bottom part of right side cargo panel (Side which your gas tank is on) and small section of flooring.
- NOTE: You do not have to take the main large panel off. These panels are very fragile and sometimes do not go back on or break in the process.
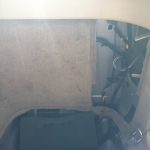
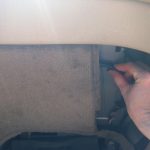
- Slightly pry open remaining side panel (part which is still attached) enough to reach hand behind panel. You will feel the metal frame of the car and wires.
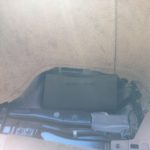
- Beware that behind the carpet cargo panel there will be another metal panel in which the locking mechanism will be behind.
- There will be a wrapped cable with two wires which will be visible once you remove the panel. These are the wires which connect to the locking mechanism. Follow the cables with your hand to the end to locate the locking mechanism. Cables will be connected to a small box.
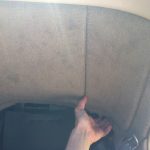
- Once you have located the small box of the locking mechanism, take your finger and reach behind until you reach the trigger and then pull to unlock the gas tank.
-
-
Take off bottom flooring.
-
-
-
Take off small side carpet panel. There is a small black cap you remove where fingers are and then you slide downward.
-
-
-
This is the exact location of the gas tank trigger.
-
-
The wire you will follow to the lock mechanism.
-

-
Panel behind which you reach your hand.
-
-
Gas tank trigger pulls towards you, rear of car.
Tags: 1999, 4, DIY, easy, gas, lid, locking, mechanism, release, steps, stuck, tank, trigger, v70, Volvo, wagon
Posted by OurVolvo.com on Aug 5, 2012 in
1999 Volvo V70 By: cn90
SOURCE: http://www.matthewsvolvosite.com/forums/viewtopic.php?f=1&t=34472
Car is 1998 Volvo V70 with 106K miles.
– Symptoms: sometimes cannot crank the engine, after wiggling the key a few times, then I can start the engine. It was intermittent, then it became permanent.
– Key can turn to Position I and Position II but not Position III (crank).
– Initially I thought it was the Ignition Switch (Electrical Portion to the LEFT of Steering Column), which was replaced but same symptoms! It turned out to be the Ignition Tumbler Lock (where you insert the key).
ATT: If you replace the Ignition Tumbler Lock (where you insert the key), there is NO need to remove the Steering Wheel at all! Read on.
1. Igntition Switch (Electrical Portion is PN 9447804, $50 at Volvo dealer. Do not use aftermarket part).
2. Ignition Tumbler Assembly (where you insert the key, Volvo PN is 8626325). I bought it for $210 from (ordered Monday and got it by Fedex on Saturday, wow fast service!):
Don Snyder
Darrell Waltrip Volvo Subaru
615-599-6294 Direct
Tel. 1-800-679-6124
Fax 615-599-6253
Don.Snyder@HendrickAuto.com
3. Tools:
– Torx set
– “Trim” Hammer (this hammer is used for carpentry trim job) is useful in this tight space
– 1/32” Nail Set
– Flat Screwdriver.
FYI, 1998 and earlier models probably have no anti-theft chip in the key. I connected the Ignition Switch (Electrical Part on the LEFT of Steering Column) to the connector and use a flat screwdriver (in the location labeled “Slot”) to crank and the car starts right up.

4. Shear Bolts are supplied with new Ignition Tumbler Lock Assembly. For those not familiar with Shear Bolts: these are used during assembly at factory, once the head on the Shear Bolt is tightened to a certain torque, the outer head snaps off, leaving a round inner head, making it difficult for thieves to remove. When you buy the Ignition Tumbler Lock Assembly, the Shear Bolts are supplied with it.
– During re-installation, I simply tightened the Shear Bolts snug without snapping the head off just in case I want to remove them later.

5. Have a look at the first picture above to be familiar with the setup:
– The LEFT side of the Ignition Assembly is the Electrical Portion of the Ignition: it turns I, II and III (crank).
– The RIGHT side of the Ignition Assembly (where you insert the key) can only be turned with the proper key and has a cable to control so you cannot remove the key if the car is not in Park. The RIGHT side turns the LEFT side via a flat piece of steel, pretty much similar to your lock at home.
Procedures:
1. Disconnect Battery Ground Cable for safety reasons.
2. Use a flat screwdriver to lift off the rubber trim, then lift the Upper Cover close to SW upward (#1), then slide it toward you so it slides out of the hook (#2).
The Lower Cover is secured by three (3) Torx #25 bolts. When removing the Lower Cover, pay attention to the part around the Lighted Ring: tug the Lower Cover outward a bit so it clears the Lighted Ring then remove it.

3. Remove Turn Signal Stalk and Wiper Stalk: Each Stalk is held by two (2) Torx #25 bolts.
4. Now you can see the Shear Bolt round head. At factory, the force used to tighten the Shear Bolt was not much, so with the Nail Set you can “chisel” it out. Angle the Nail Set in such a way that it angles about 45 degrees and tap it with the “trim” Hammer Counter-Clockwise to remove the Shear Bolt.
This is why you do NOT need to remove the Steering Wheel when replacing the Ignition Tumbler Lock Assembly.

5. Use a flat screwdriver to gently disconnect the Connector to the Ignition Switch (left side of Steering Column).
Disconnect the three Torx Bolts holding the Horn/Air Bag Ring (aka “Clockspring”).
Once the Shear Bolts are removed, the Cylinder Lock Assembly will fall down, so support it with your knees.

6. Now disconnect the Lighted Ring connector then remove the Lighted Ring from the Assembly.
7. To remove the Parking Release Cable: squeeze both sides of the tabs and use a flat screwdriver to gently pry it out. But first use a Sharpie to mark the depth of insertion of this Parking Release Cable so you know how much to insert it to the new Assembly. I think the key needs to be in position II to insert this Parking Release Cable.

8. If you decide to keep your Ignition Switch (Electrical Portion), then remove it using Torx #20 key, then transfer it to the new Ignition Tumbler Assembly. Note there are a large and a small notch so it can only be aligned 1 way.
However, at 100K, I think it is better to replace both the Ignition Switch (Electrical Portion) and the Ignition Tumbler Assembly.
9. Re-assembly is straightforward, make sure the notch on the Ignition Tumbler Assembly lines up with the Steering Column hole before you tighten the Shear Bolts. Again, I did not snap the heads of the Shear Bolts, just finger-tight and snug.
Also make sure the Rubbers around the Turn Signal and Wiper Stalks fit properly on the Upper and Lower Covers.

Tags: 1998, cylinder, DIY, ignition, lock, switch, v70, Volvo
Posted by OurVolvo.com on Jul 20, 2012 in
1999 Volvo V70 
A very special thanks goes to my friend Rob at http://www.volvotips.com/ who helped with priceless advice every step of the way.
BRIEF: While you may enjoy reading the full story of my searches for repair/replacement of my 1999 Volvo V70 Ignition Switch and/or Key Lock Cylinder Problem with Key Rotating Freely at 360 Degrees, it is more probable that you want to fix your car first.
The foremost and cheaper thing to do is check the electric part called the Ignition Switch. The ignition switch is attached with two screws on the LEFT side of the ignition assembly costs about $60 from either the store or the dealer (dealer probably will only bit around $10 more expensive but it will be a genuine part) and is recommended for replacement every 100,000 miles.
IMPORTANT: You can still start the car even if the switch or the ignition cylinder or something in the brackets is broken. Unscrew the ignition switch and with a key in the ignition, in POSITION II, insert a flat head screwdriver as shown on the picture below. Twist the screwdriver and the car will start.


The ignition switch comes in at least two versions in the newer models and with our luck came with both version in the 1999 V70 which could be determined by taking it OFF (not apart if you don’t want to break it) or by calling Volvo with your VIN number. The part is also available by BWD via Advanced Auto Parts and/or Autozone, if you don’t want to wait on the dealer. The part is NOT yet in their online catalogue, but it is found in the printed master catalog. 1999 Volvo with chassis starting from CH587537 take Part. No CS1054, while chassis up to CH587537 take Part. No CS1057.
I honestly to this day do not know which one goes on the Volvo with chassis No CH587537 and I do hope that as you are reading this you are realizing this is the chassis number of your Volvo. Anyhow, take the switch out and it will be obvious which one you need.
Finally, don’t try to fix this part, as there is not much to fix as you can see on the picture below. Just get a new one and replace it. I tried to fix mine when it was not broken and promptly broke it as a result. Volvo has done a really Mickey Mouse job on this one.
If you are seeing this part of your switch in photo below, you have done what you are NOT supposed to and opened the switch. It is very hard to get everything aligned back and re-shut. But of course curiosity kills the cat – but this is a $75.33 learning experience. Basically think, if you followed the previous directions and started the car with using a screwdriver, this part works fine.

Tags: 1999, 360, 850, degrees, DIY, freely, ignition, Key, part, rotating, S80, switch, v70, Volvo, with
Posted by OurVolvo.com on Jul 15, 2012 in
1999 Volvo V70 A very special thanks goes to my friend Rob at http://www.volvotips.com/ who helped with priceless advice every step of the way.
BRIEF: While you may enjoy reading the full story of my searches for repair/replacement of my 1999 Volvo V70 Ignition Switch and/or Key Lock Cylinder Problem with Key Rotating Freely at 360 Degrees, it is more probable that you want to fix your car first. So, first things first in two easy and simple steps:
(1) Make sure the problem is NOT in the electric part called the ignition switch, which is attached with two screws on the LEFT side of the ignition assembly or steering wheel. See how here: 1999 Volvo V70 IGNITON SWITCH (Cost: around $60-$75).
 (2) If it is NOT the ignition switch, you will need to order the whole ignition assembly, which comes with the “coded” key ignition cylinder inserted into the bracket which attaches around the shaft behind your steering wheel. Don’t waste more time, find your VIN number and call to order Volvo part # 8626325 for $225 (+10S&H + Tax) from:
Don Snyder at Darrell Waltrip Volvo Subaru
615-599-6294 (direct) or
1-800-679-6124 (toll free) or
Don.Snyder@HendrickAuto.com
We ordered our part on Tuesday afternoon and received it promptly on Friday morning via FedEx.
Don’t forget to mention ourVolvo.com INTERNET SPECIAL. Now here’s the long story:
Recently, my ignition key on 1999 Volvo V70 started messing up. As the problem persisted for a week or so, the key began freely rotation at 360 degrees without ever catching and starting the car. With such symptoms you can have one or all of the following problems:
(1) Ignition switch, the electric part located on the left of your steering wheal has gone bad. See how to replace it yourself for around $60 or redneck-fix-it here.
(2) Ignition key lock (where your key goes in). This part is precut only by Volvo in Europe by your VIN number. See costs and repairs here:
(3) The metal guillotine, which locks your steering wheel or some other metal part within the ignition assembly, has broken. There’s no way for you to take it apart and fix it. There’s no way for you to take the ignition cylinder out of the assembly. There’s no way to order them separately. They have to be ordered together from Volvo and mounted as described here.
In some rare cases, you may be lucky and have all of the above. Anyway, if you have to change the ignition assembly, it’s recommended to change the ignition switch as well. Especially the older ones with the pin prongs sticking out get oxidized and just cleaning them is not always dependable.
Several tips to remember before you begin:
- If you don’t want to waste your time, just drill the two holding bolts out from the top. The top part of the bracket has no treads.
- It may be difficult to take the top part of the holding bracket without breaking the tiny clear plastic years of the air bag assembly. You can use your old top bracket as it is.
- When you try to put the cover back together, cut your wheal 90 degrees to the left and then the bottom cover will slide in place very easy.
- The wholes for the ignition switch have no treads. Just tighten the screws in and they will snug real good with the soft metal inside the wholes.
- And finally, if it ain’t broken don’t try to fix it!
Now, see how to fix (DIY) the Ignition Switch and replaced the Ignition Key Cylinder and Assembly on our 1999 Volvo V70? Use one of these helpful tutorials depending on your Volvo model. We’ve made copies of them on our website in case they get lost in the forums:
Also a much necessary price quotes and dealer / part store review:
Volvo of Chattanooga
$99 initial diagnostics (if you can get your car towed to them)
$301 ignition cylinder
$1100 ignition column
Volvo of Knoxville (800) 346-8762
$200 ignition cylinder plus $356 labor
Nalley’s Volvo in Atlanta (800) 671-3174 had surprisingly reasonable prices and a very, very helpful part/service adviser, which no other Volvo dealership seemed to offer.
Dayer Volvo of Atlanta (888) 593-3772 gave a quote on parts and repair in the range of $700-900. When I asked for a bit more specific number I was told $840. Seriously? Guess when I’ll go there for a repair – like NEVER. Thumbs down plus BEWARE!
Taska Parts was also recommended on some forums as a cheaper alternative. They order from Volvo and quoted me $230 for the ignition cylinder but after calling and asking 3 times I was still not clear if I am getting just the key cylinder or the whole assembly.
Tags: 1999, 360, cylinder, Darrell Waltrip, degrees, DIY, Don Snyder, freely, ignition, Key, lock, part, problem, rotating, switch, v70, Volvo